2025 Model
Reflex - Quick Guide
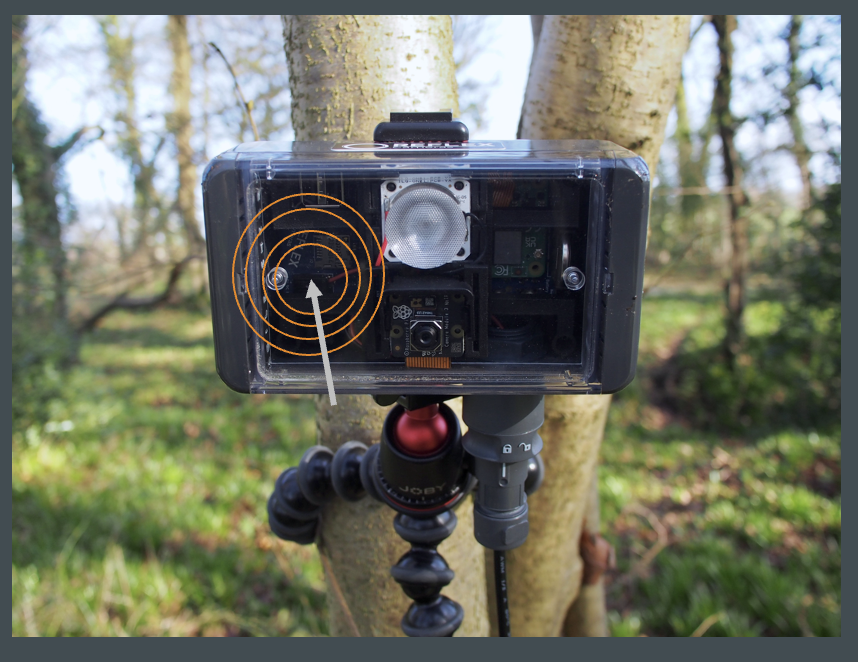
Position the camera within 4m of the roost. For optimal results position the camera slightly higher than the feature and look down onto it.
Plug in the battery.
Plug in the camera - it will start automatically.
Wait for the camera to start a Wi-Fi hotspot. This will take about 20 seconds.
Connect to the cameras Wi-Fi hotspot with your device (phone or computer)
- SSID =
REFLEXCAMERA-REFLEX0000- replace 0000 with the number printed inside the camera lid - Password =
REFLEXREFLEX- on Windows it may ask you to enter a pin number rather than a password. In this case, pressconnect using a password insteadand enterREFLEXREFLEX. On some Android phones you may receive a notification statingWiFi has no Internet Access. Tap for Options. To connect to the hotspot, tap this notification then selectThis network has no Internet Access. Stay connected?and also checkDon't ask again for this network.
On your device (phone or computer) open Chrome and head to http://10.42.0.1:5000 to see the camera’s Reflex settings webpage.
Use the camera’s Reflex settings webpage to check:
- that the roost entrance is visible and the image includes the area beneath the feature where the bats will drop out
- that the green boxes cover only the area of interest and excludes anything that could move such as leaves and cobwebs
- that the camera is in focus - adjust the focus with the
Focus 0.0toFocus 10.0slider or useAutofocus - that the motion sensitivity is appropriate:
- high sensitivity is suitable for most applications
- medium sensitivity is suitable when there are lots of insects and the camera is close to the feature. The motion will only trigger when a larger portion of the image changes. This will reduce false triggers associated with insects and noise.
- that the LED and FPS are appropriate to your survey objectives:
- 120 FPS + LED Extreme (60) provides the clearest individual frames - good for species identification, but depletes batteries more quickly
- 30 FPS and LED Low (20) maximises battery life - good for finding whether bats roost in a tree - batteries will last for a long time on this setting. As bats move quickly it can be hard to identify to species level at 30FPS unless the bats spend time sitting still at the roost entrance
It is good practice to clear logs (on the Log Page) and delete all media (on the Media Page) when you have finished setting up the camera. You will have recorded some videos during the setup and it will save you time later if you delete these now.
Leave it to run - the camera will now handle recording activity automatically.
In the daytime the camera is scheduled to turn itself off after 15 minutes and will turn itself back on 20 minutes before sunset. If the camera unexpectedly powers off during setup this is the most likely reason. If this happens just unplug the camera and plug it back in and it will power up for another 15 minutes. It will always power up automatically 20 minutes before sunset.
Reflex - Full Guide
Before use in the field
Follow the steps in this guide to ensure you can connect to the REFLEX camera.
Use the devices (phone or computer) that you intend to use when setting up the REFLEX camera in the field.
Physically adding or removing a Micro SD card
Turn the camera off.
Lay the camera on its back so the clear window is facing up. Firmly press down on the side of the clear window that you want to open near to where the clear plastic meets the grey plastic and insert a suitable flat head screwdriver into the slot between the two plastics. Use the screwdriver to push the grey tab outwards and away from the clear window and the hinge will pop open. The clear plastic lid can then be opened.
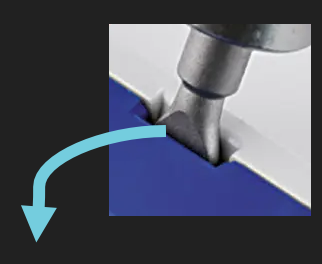
Lever the clear window up and open.
Use a finger or soft plastic tool to push the micro SD card in or out of its slot (on the left hand side of the camera).
The SD card will need formatting by using the Format SD card button on the Media Page on the Reflex settings webpage. Futher information is included below.
If removing the micro SD card after it has been released tip the camera upside down so the card falls out being careful not to lose it.
Battery connections
Details of different battery options are described in the Compatible Kit page on this website.
Connect the relevant cable to your battery.
Leisure Battery
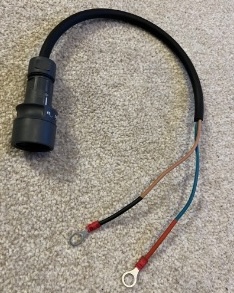
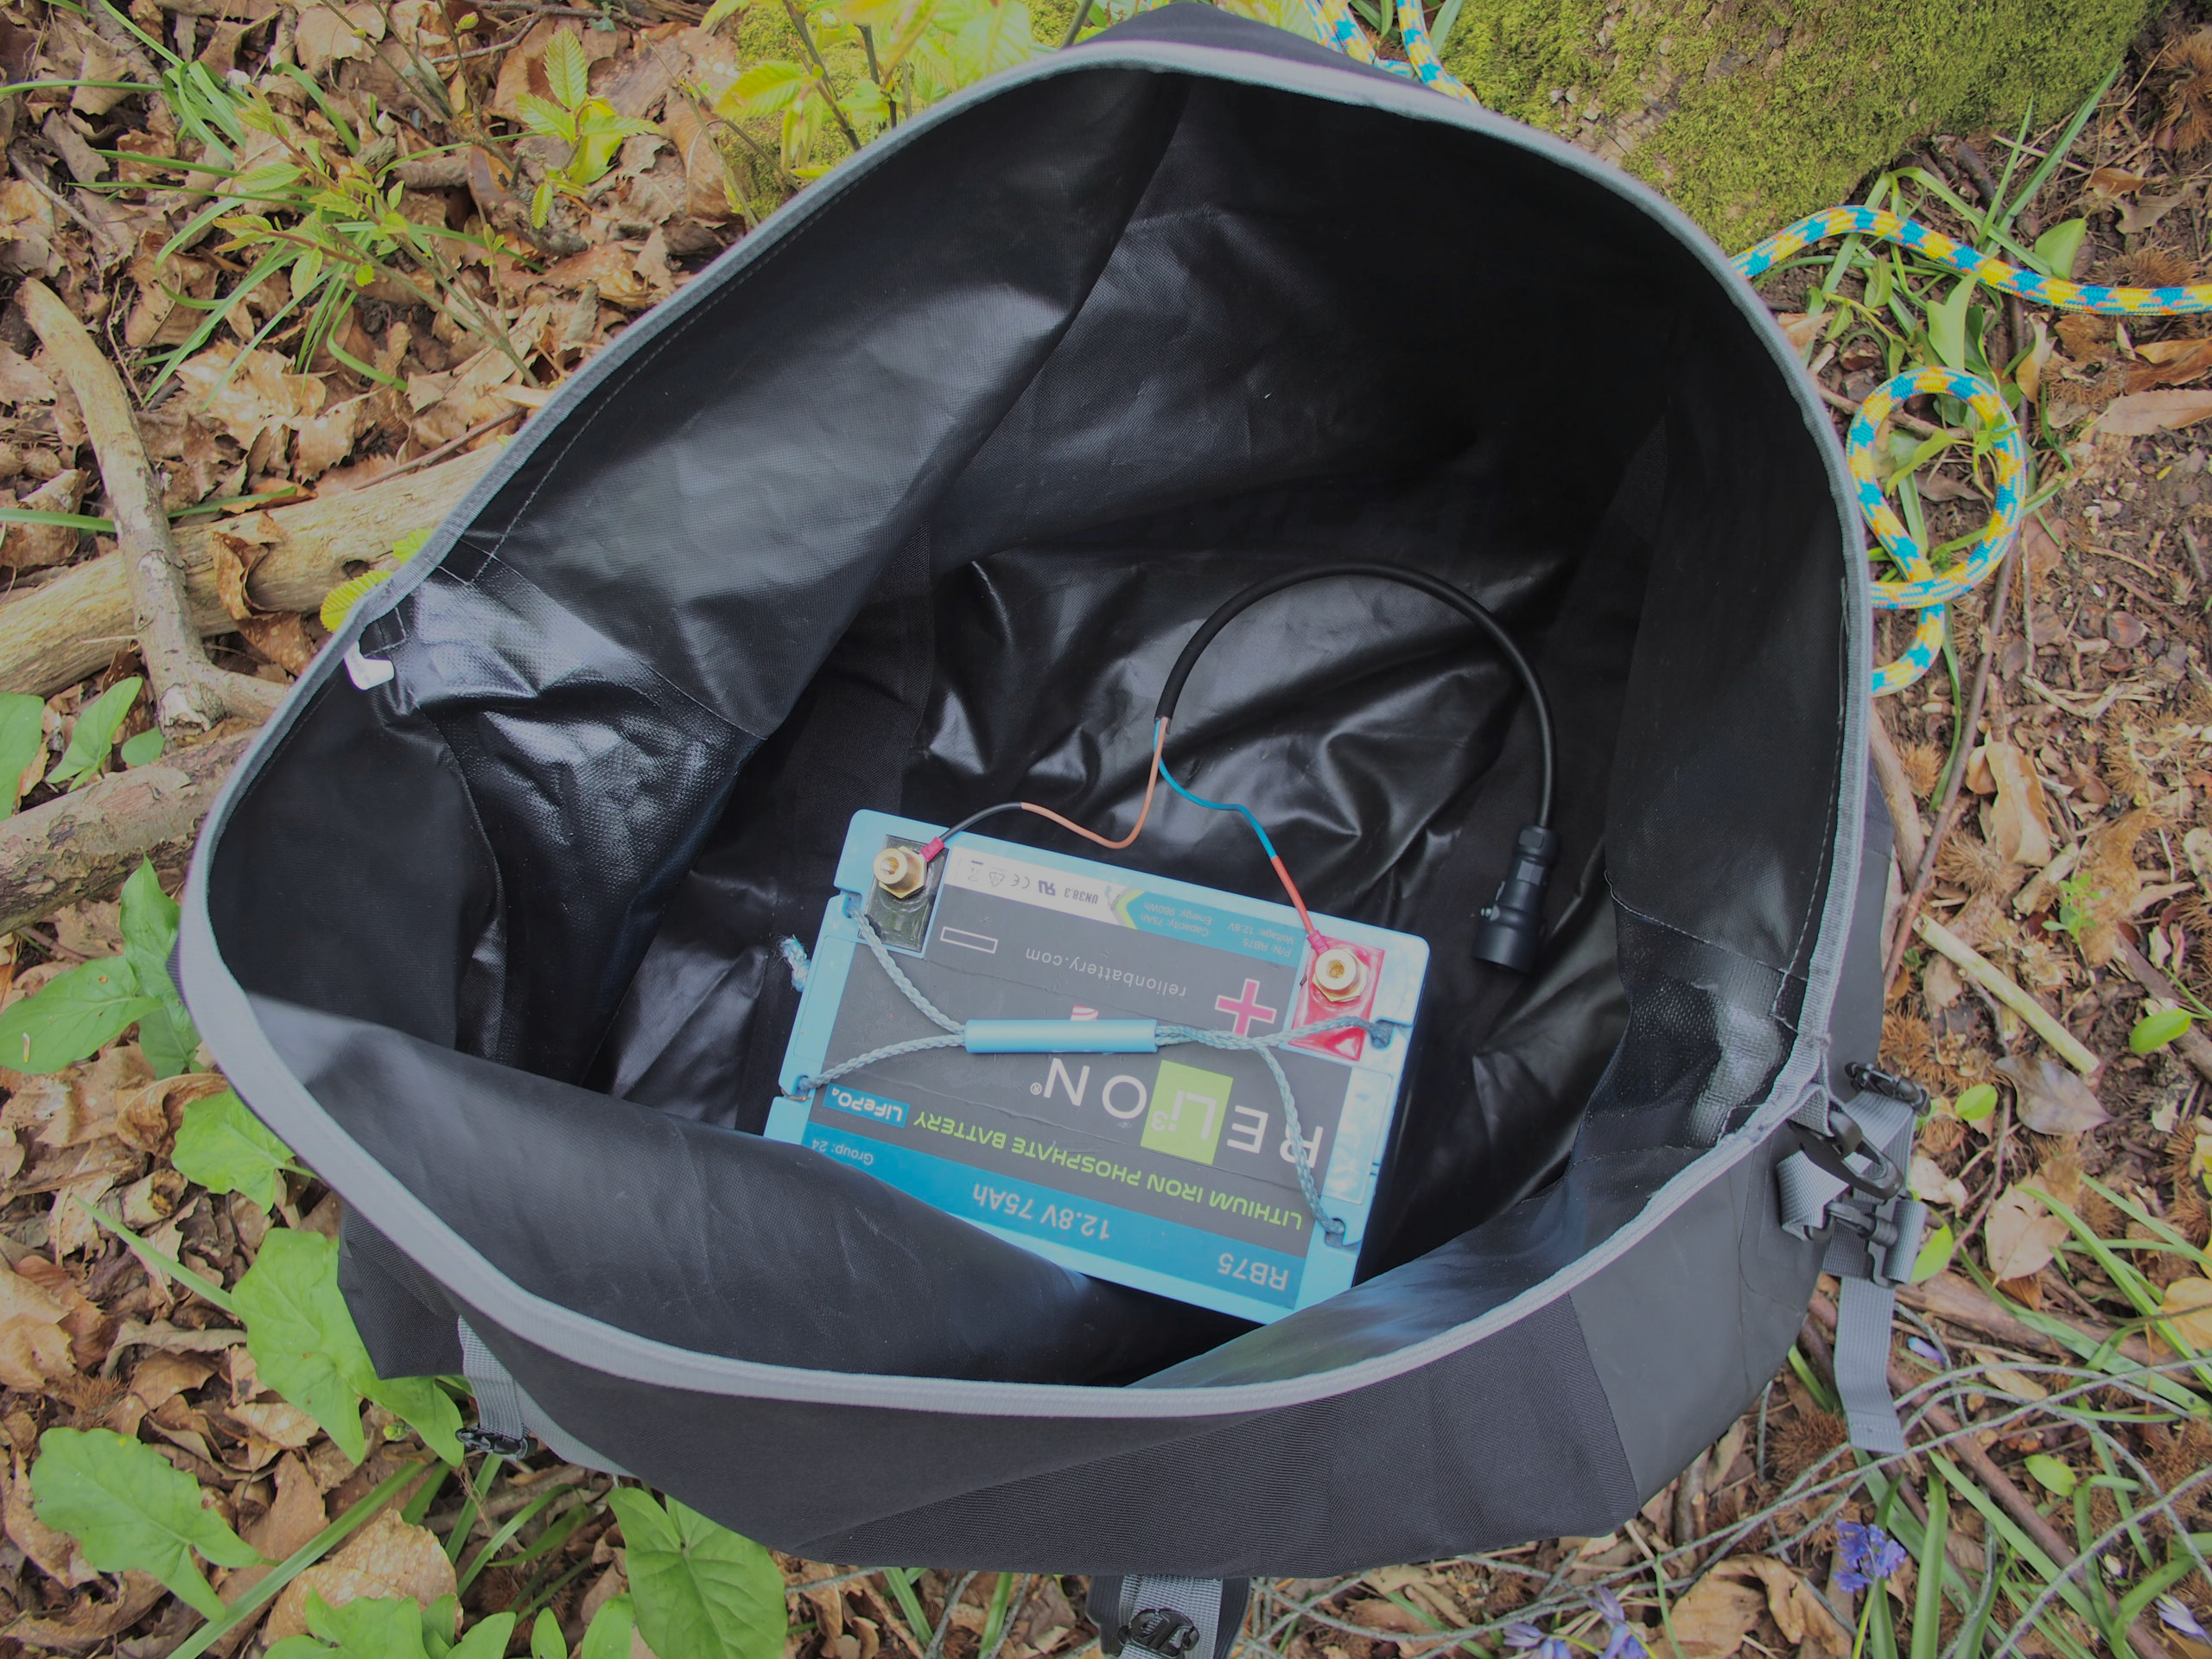
If connecting to a leisure battery attach the Reflex Leisure Battery Terminal Connector to the relevant battery post.
Black is negative, red is positive. The red and black indicators are located on the wires closest to the metal rings.
Be careful not to touch both battery posts at the same time.
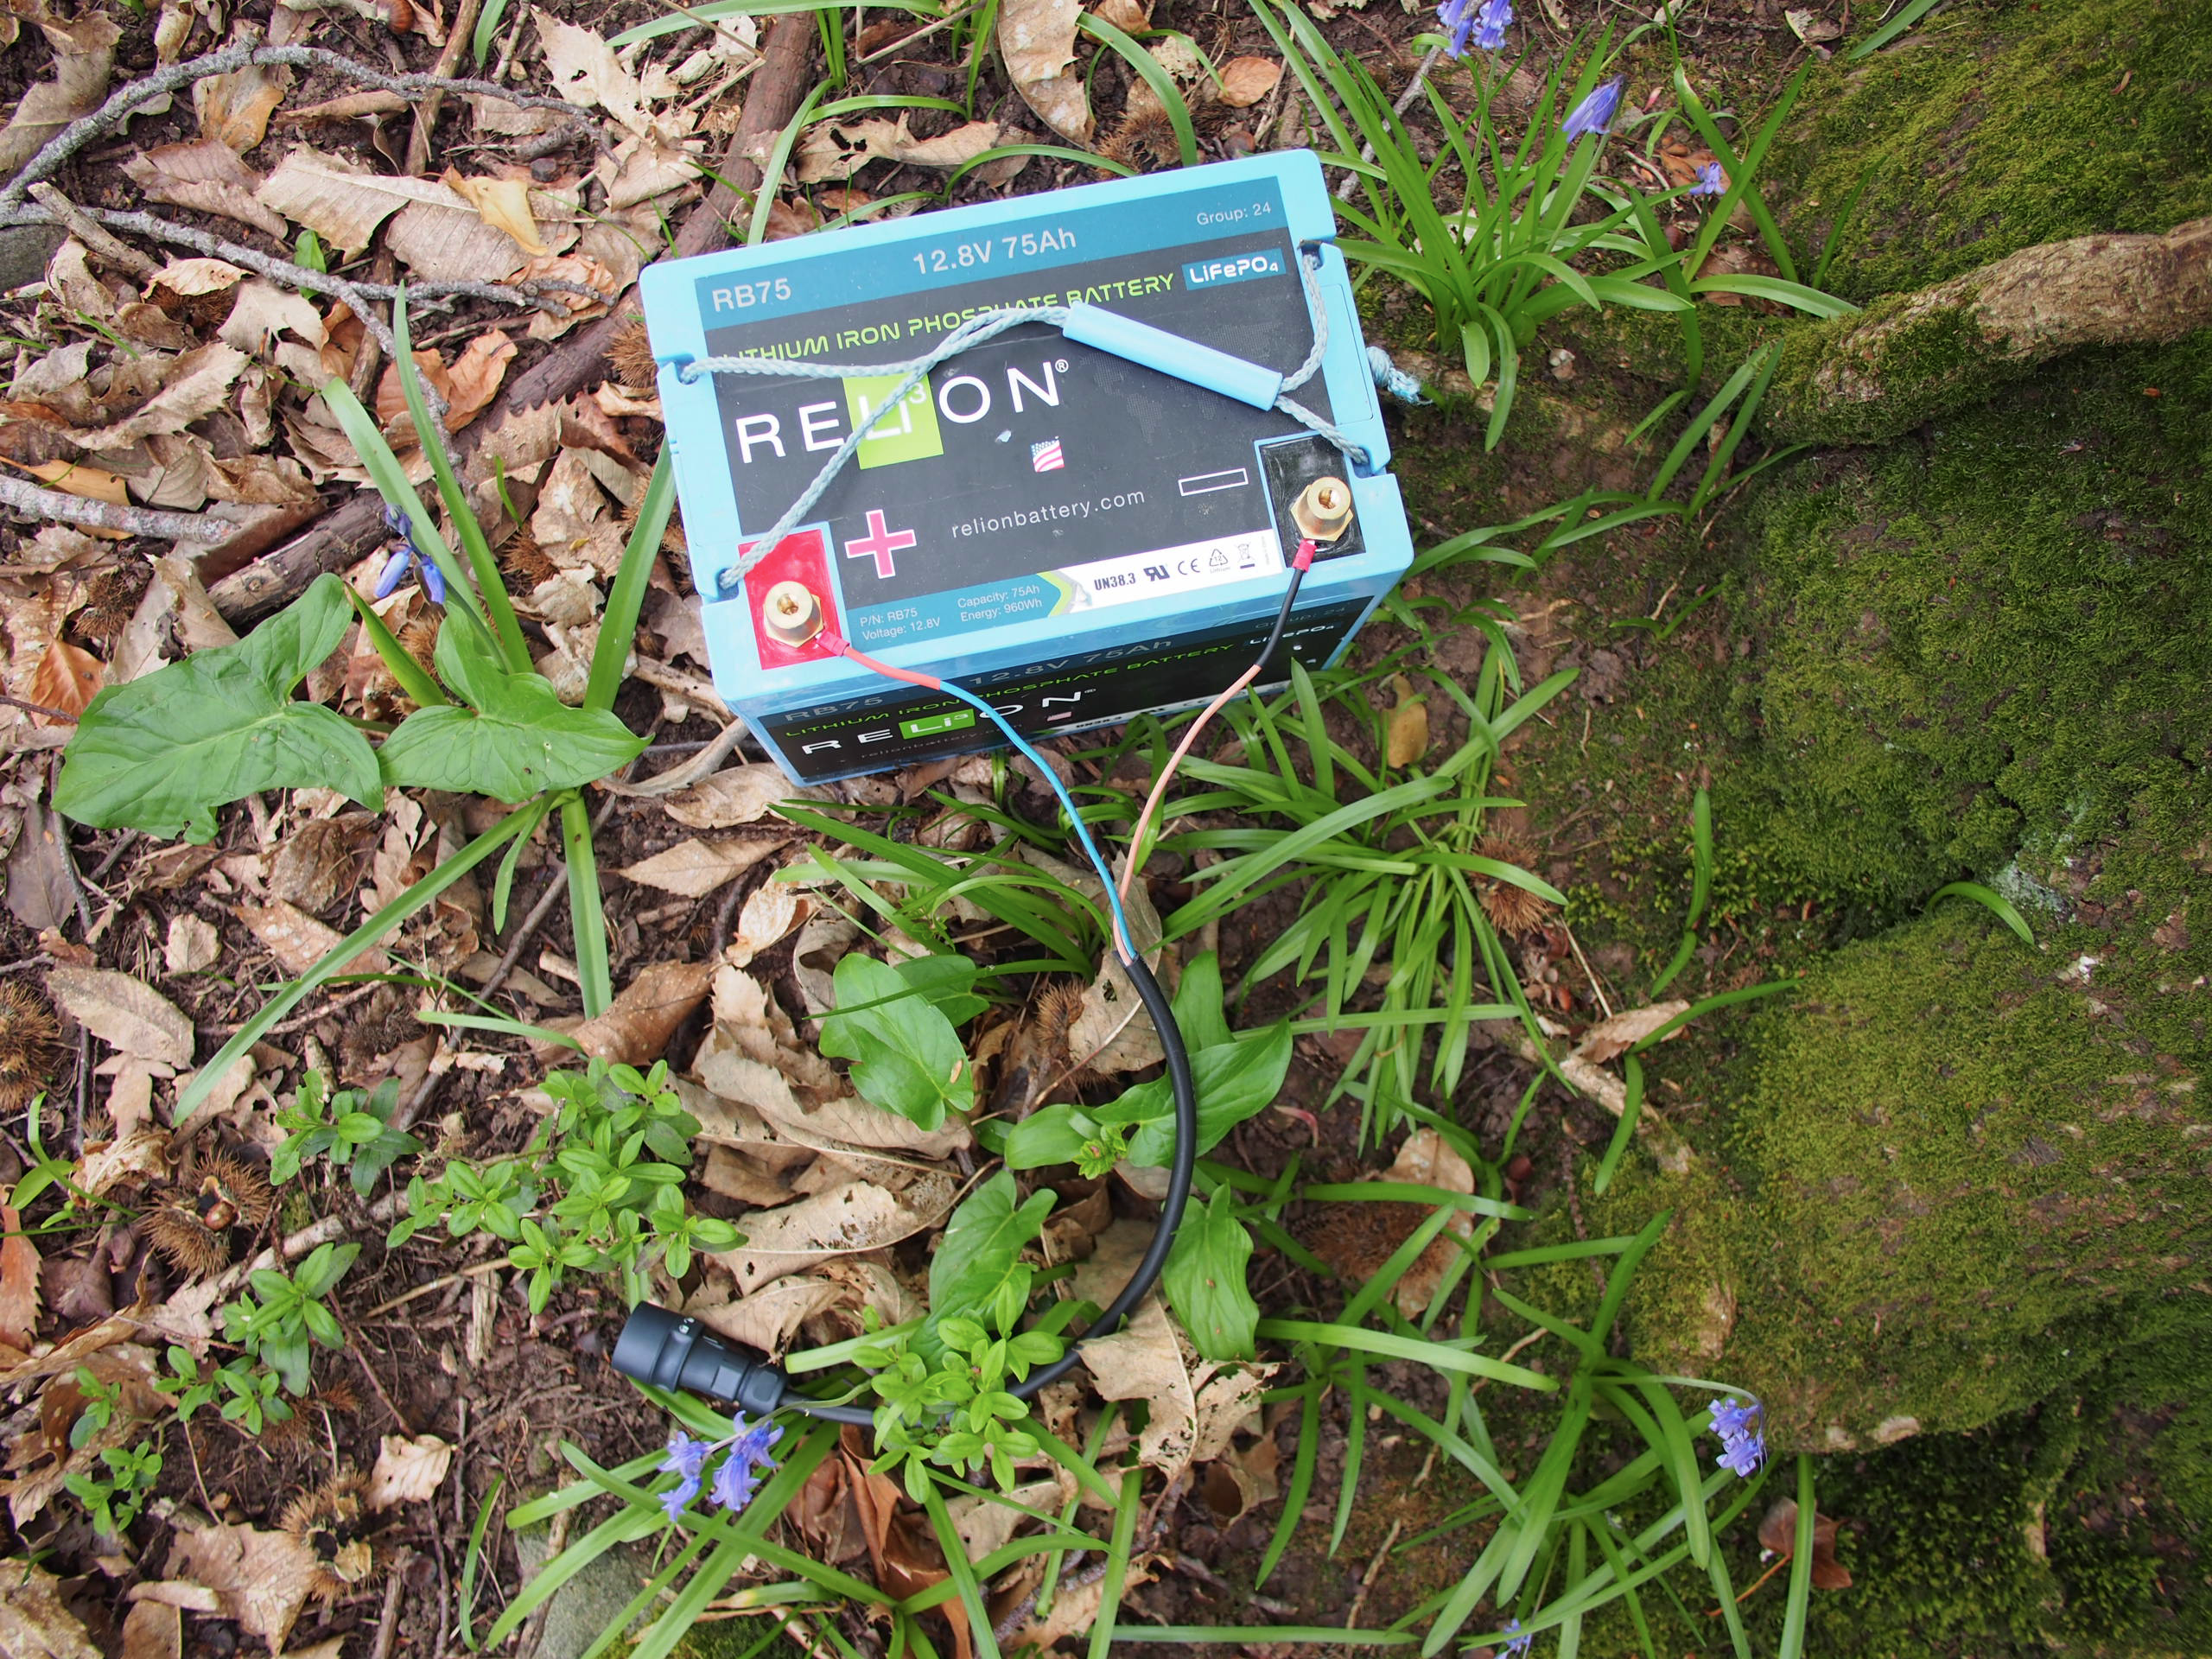
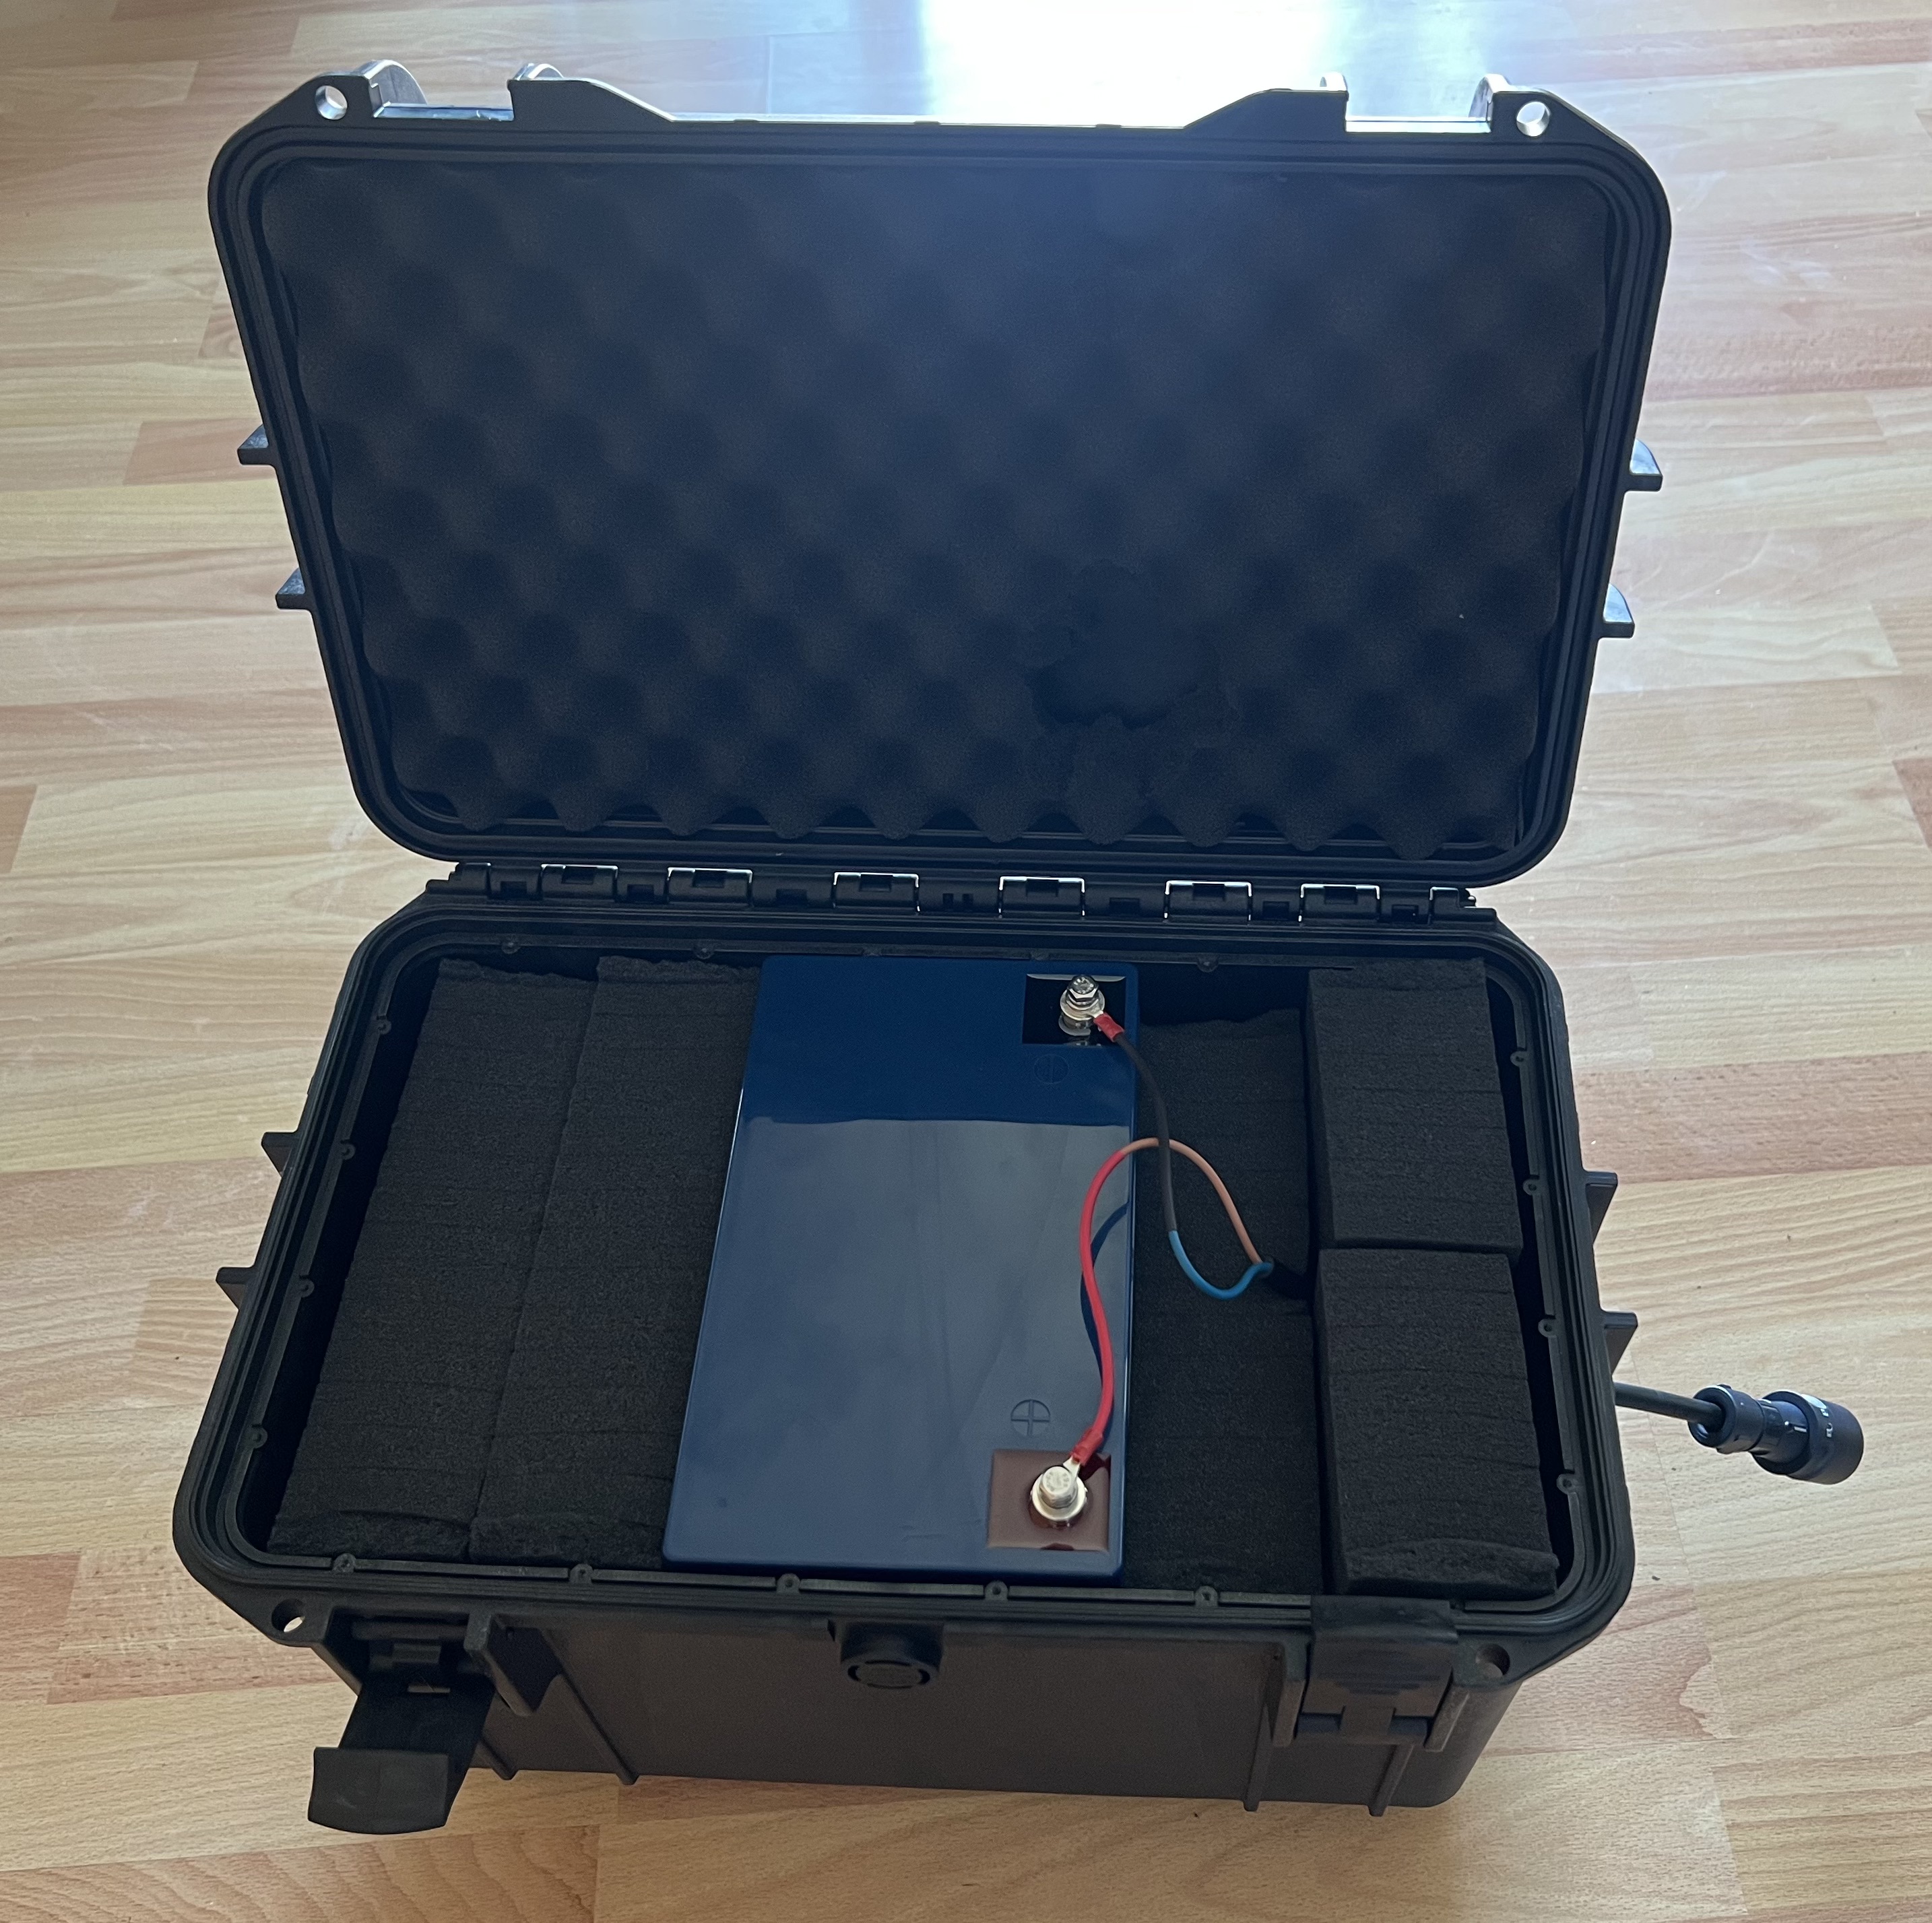
Waterproof the battery in a suitable bag or box. If using a roll top bag run the cables along the roll whilst ensuring that the bag is sealed properly and will remain waterproof.
Be careful not to touch both battery posts at the same time.
Large Talentcell
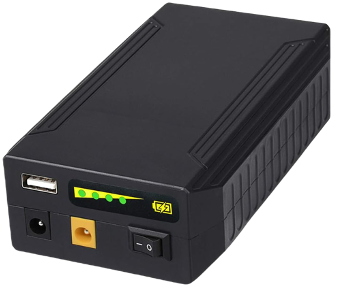
If connecting to a talentcell battery push the Reflex 12v Male Barrel Jack Connector into the 12v output port on a suitably rated Talentcell.
Make sure this connection won’t disconnect during deployment. Consider using an elastic band or electrical tape to secure the cable to the battery.
Turn the Talentcell on.
Extension leads
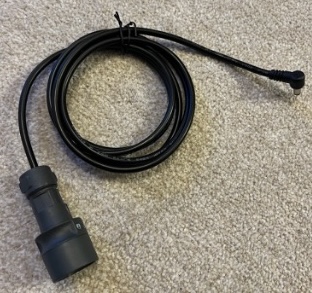
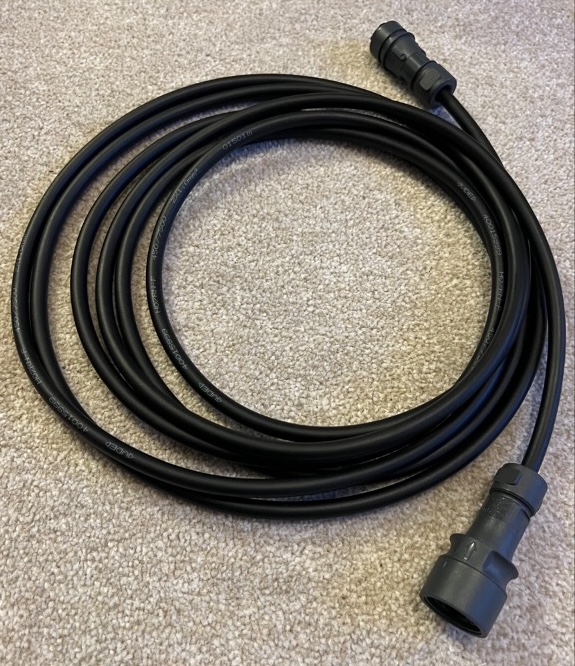
Reflex Standard Extension Cables extend the connection between the battery connectors described above and the camera (via the port on the bottom of the camera). They have been produced for demanding use with a weatherproof, extremely durable cable. Using the extension cables allows you to position the camera at height whilst the battery stays on the ground. You can still change the batteries and download videos over WiFi without access to the camera itself. When running the Reflex Standard Extension Cables up a tree, wrap them around the trunk or branches to reduce moment and drag.
Each Reflex Standard Extension Cable is just over 4m long. Multiple Reflex Standard Extension Cables can be linked together if you want to position the camera at a greater height. To buy additional cables use the contact form on our webpage.
Operating the camera
Connecting power
- Attach the relevant battery connector (
Reflex Leisure Battery Terminal ConnectororReflex 12v Male Barrel Jack Connector) to the battery - Attach the
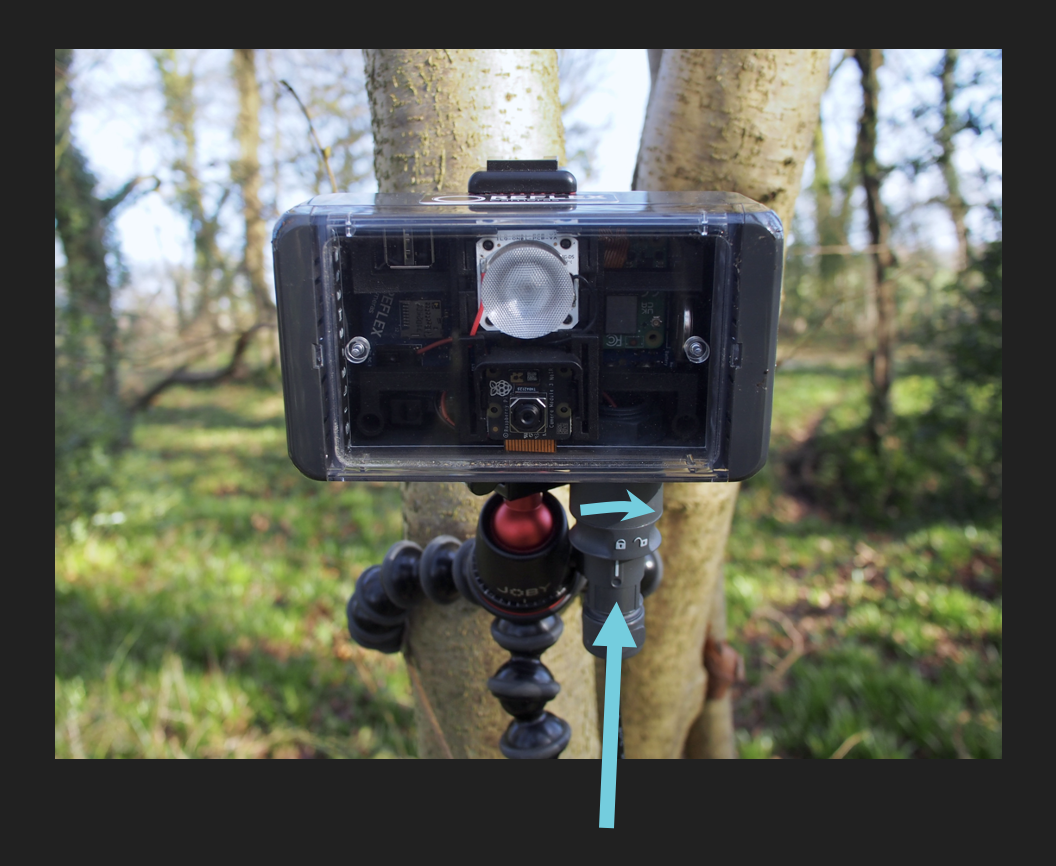
Reflex Standard Extension Cableto the battery connector:- Make sure the connectors are in the unlocked position
- Line up lines on the battery connectors
- Push the connectors together firmly
- Twist the connector clockwise to lock, the lock symbol should line up with the dot
- Connect the extension cable to camera:
- Make sure the connectors are in the unlocked position
- Line up the lines on the connectors
- Push the connectors together firmly
- Twist the connector clockwise to lock, the lock symbol should line up with the dot
- The camera will boot automatically
- Wait for 20 seconds whilst the camera turns on and starts a WiFi hotspot (or connects to a saved WiFi connection)
Checking camera status
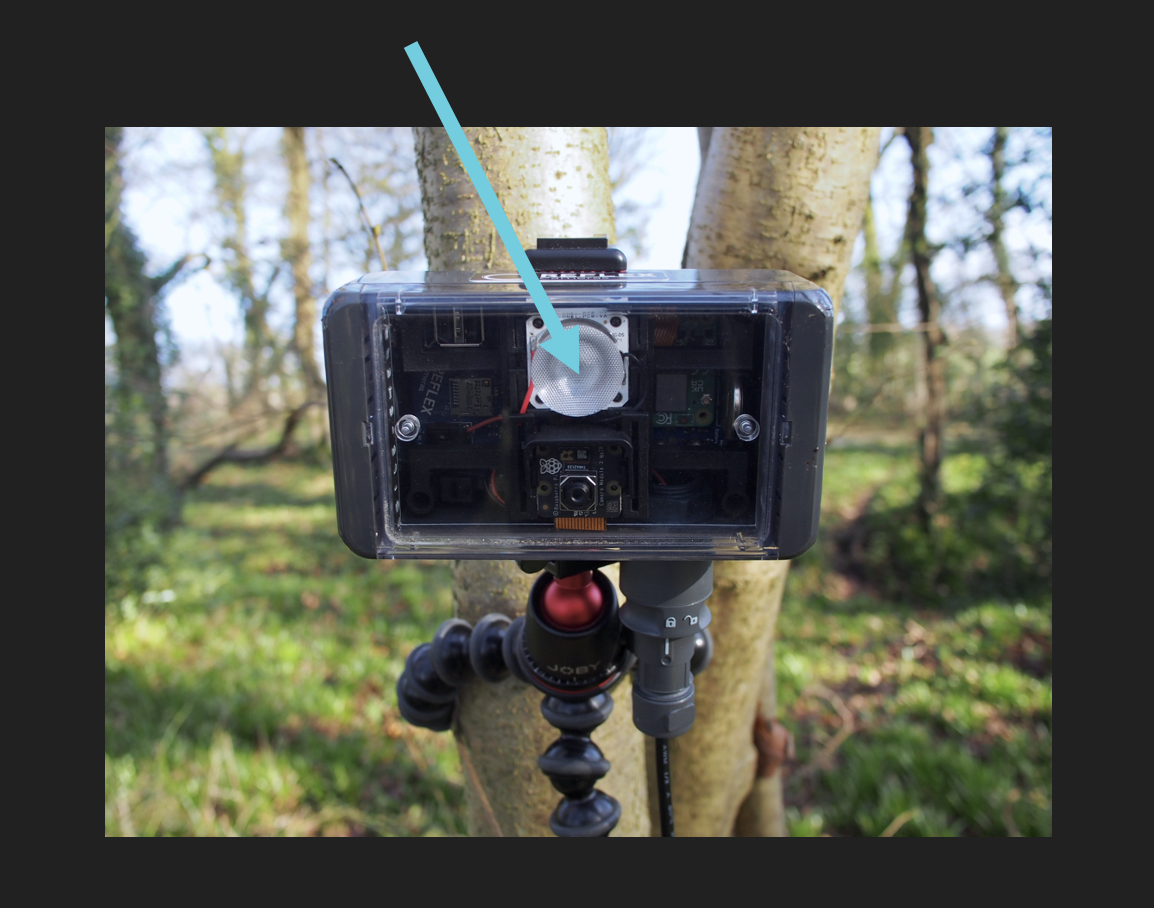
When the camera is fully running the large infra-red LED will be lit and visible on a phone camera as a faint red glow.
Connecting to the settings page
Connect to the camera’s WiFi hotspot:
- SSID:
REFLEXHOTSPOT-REFLEX0000- replace 0000 with the number printed inside the camera lid - Password:
REFLEXREFLEX- on Windows it may ask you to enter a pin number rather than a password. In this case press connect using a password instead and enterREFLEXREFLEX. On some Android phones you may receive a notification statingWiFi has no Internet Access. Tap for Options. To connect to the hotspot, tap this notification then selectThis network has no Internet Access. Stay connected?and also checkDon't ask again for this network.
Open an internet browser on your phone or laptop and head to the web address http://10.42.0.1:5000
Updates
To check that your camera has the latest updates - compare the date at the bottom of the Reflex settings webpage with the latest update listed in the REFLEX Camera Software Changelog
If the date on your camera’s Reflex settings webpage is older than the latest date in the REFLEX Camera Software Changelog document then there are updates available for your camera.
The camera needs to be connected to the internet to receive updates. A method is described in the ‘Advanced Users’ section below. If you have followed this guide but still need help updating the camera contact us using the contact form on our webpage.
Automatic shutdown in the day
The camera will shutdown after 15 minutes if turned on in the daytime.
The camera will automatically schedule itself to turn back on 20 minutes before sunset.
If you are still setting up the camera when the camera shuts down, disconnect and reconnect power to turn the camera back on for another 15 minutes.
The shutdown can be delayed by three hours using the Delay Shutdown button on the Schedule page of the Reflex settings webpage.
Reflex settings webpage
The Reflex settings webpage is described below. This is provided by the camera over WiFi.
The website has five pages:
- Home
- Schedule
- Log
- Media
- WiFi
Home
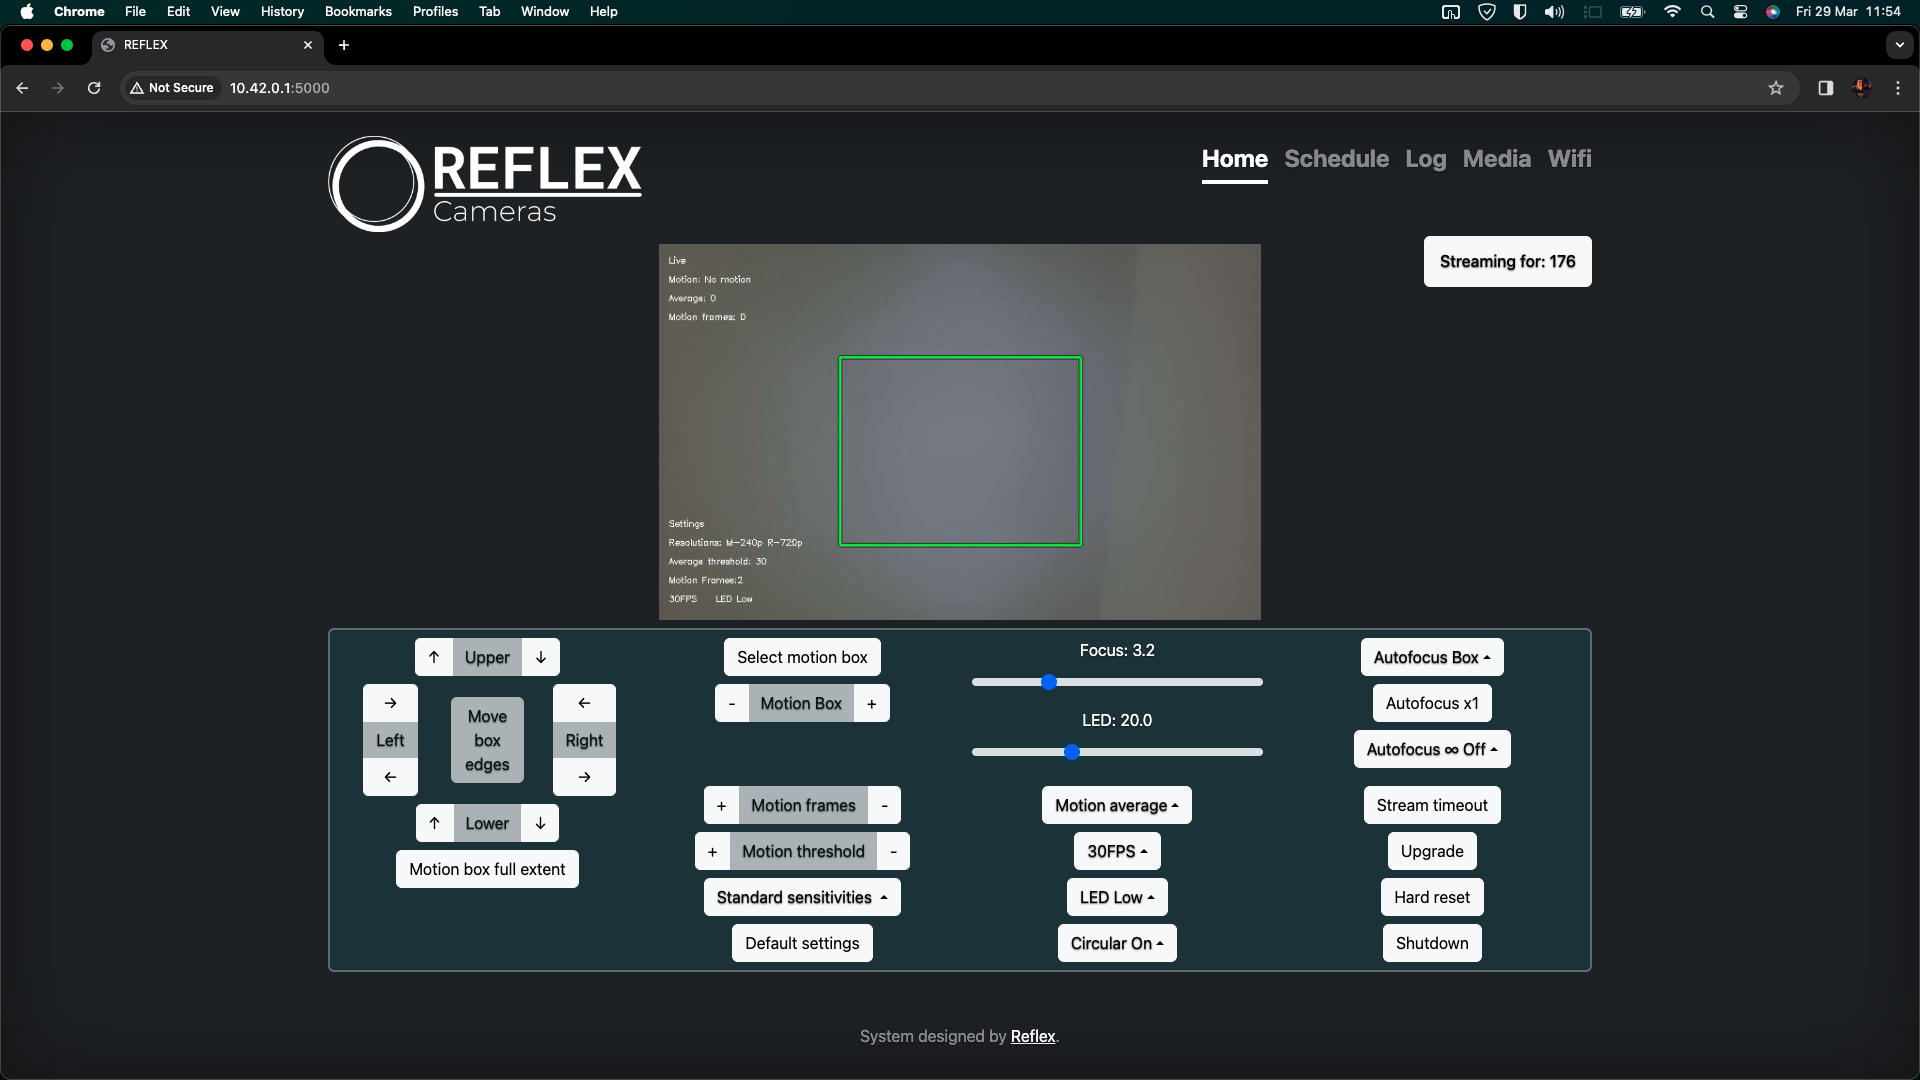
Video feed
A live video feed is displayed at the top of the page. This feed can be used to check the position of the camera and fine tune the motion detection setup.
Motion will only be detected within the green boxes, exclude any areas you are not interested in. The boxes turn red when the camera detects motion and is recording.
The purple box is used by the autofocus function. When the camera is set to Autofocus Box the autofocus will attempt to focus on the portion of the image within this purple box.
The live video feed is displayed at a lower resolution than the camera is recording this ensures the feed runs smoothly over WiFi. The videos recorded by the camera are of much higher quality.
The live video feed stops after three minutes (a countdown timer indicates how long the feed is live). Refresh the page to restart the video feed for another three minutes.
Settings
Select Motion Box
Select a box to move its edges, it will become bold when selected.
- Motion Boxes + Add or remove additional green motion boxes.
↑ Upper ↓
→ Left ←
← Right →
↓ Down ↑
Arrows to move box edges. Move the boxes to exclude cobwebs/ leaves and other objects that might move and trigger unwanted recordings.
Default settings Use this button to apply the camera’s default settings.
These settings are optimised for long deployments and provide relatively low but acceptable lighting to minimise the camera’s power consumption. For clearer images increase the LED brightness to improve the image quality.
Focus 0.0 to Focus 10.0
Slider for fine-tuning the camera’s focus. Right = close focus. Left = infinity. Watch the video feed and adjust the slider until the image is in focus. It can be helpful to zoom into the image to triple check it is in focus. Fine tuning this slider tends to be more reliable than using Autofocus when there is not much light (i.e. under a tree canopy).
30FPS 60FPS 120FPS
Frames per second (FPS) refers to the number of images recorded in each second of video. Higher frame rates provide clearer images with less blur. There is a tradeoff however as each frame needs more light to compensate for the short exposure time. Higher frame rates are therefore associated with better quality videos but also higher power consumption due to the LED brightness and CPU processing demands.
The best framerate will depend on your objective, see the table below.
| Objective | Recommended framerate | LED for subject < 1m away | A 12v 50ah battery should last |
|---|---|---|---|
| To record as many nights as possible | 30FPS | Low (20) | 26 nights |
| To record good quality bright images | 60FPS | Medium (40) | 19 nights |
| To record the best possible images for species identification and see bat behaviour in detail | 120FPS | Extreme (60) | 16 nights |
LED Low LED Medium LED High
Default settings for LED brightness.
Motion Boxes Motion Average
There are two different motion algorithms built into the camera, Motion boxes and Motion average. These can be selected using this dropdown. The algorithms only search for changes within the green box.
Motion boxes - The default setting. This algorithm looks for pixel differences and draws boxes (blue on the live video feed) around changed pixels. If the blue box size is larger than the threshold value then a recording will start. This setting uses marginally more power than Motion average.
Motion average - This algorithm looks for changes in the light, medium, and dark light bands within the image. If any of these bands gets darker or lighter a recording will start. This mode is less sensitive to small movements than Motion boxes but works very effectively when surveying a bat from a short distance as the bat represents a larger area of the total frame. The algorithm is less sensitive to small changes so it can reduce the number of recordings of small insects.
To test the motion settings, set the camera up in a dark room. Load the webpage to watch the video stream and make some movement with your hand or another object. Test out different sensitivity settings to understand how they trigger. If the LED is on a low setting make sure that noise in darker areas of the image is not triggering motion events. If the noise in darker areas of the image is triggering motion events during testing, consider increasing the LED brightness or decreasing the motion sensitivity with the Sensitivity Motion area and Motion frames buttons.
Autofocus Box Autofocus Centre Decide whether to autofocus based on the purple box in the video feed by selecting Autofocus Box or based on the centre of the image by selecting Autofocus Centre. Autofocus Centre is often more reliable at focusing the image than Autofocus Box. In low light conditions some manual fine-tuning using the focus slider is often needed after using autofocus.
Autofocus x1 Initiate autofocus of the camera.
Autofocus ∞ ON Autofocus ∞ OFF Autofocus on boot. The camera will attempt to refocus every time it starts up. As the autofocus is not always reliable it is recommend that this setting is set to Off.
LED 0.0 to LED 60.0
Fine-tuning slider for LED brightness.
Circular On Circular Off
Circular On - Pre-record for 2 seconds before motion. Circular Off - Do not pre-record.
Upgrade
Software updates may have been issued for the camera, see here: REFLEX Camera Software Changelog
To download an update the camera must be in WiFi mode with an internet connection. Some updates can take some time. Wait for the progress tracker to reach 100% before refreshing the page. If the update hangs and does not change for 30 seconds or more manually refresh the page.
If you have followed this guide but still need help updating the camera contact us using the contact form on our webpage.
Shutdown
To avoid data loss or damage to your camera, always shut it down properly before disconnecting the power.
Before disconnecting the power source, follow these steps to shut the camera down safely:
- Initiate the shutdown process by clicking
Shutdown. - Wait for the shutdown process to complete, indicated by a confirmation message.
- Once the confirmation message appears, it is safe to unplug the camera.
Schedule
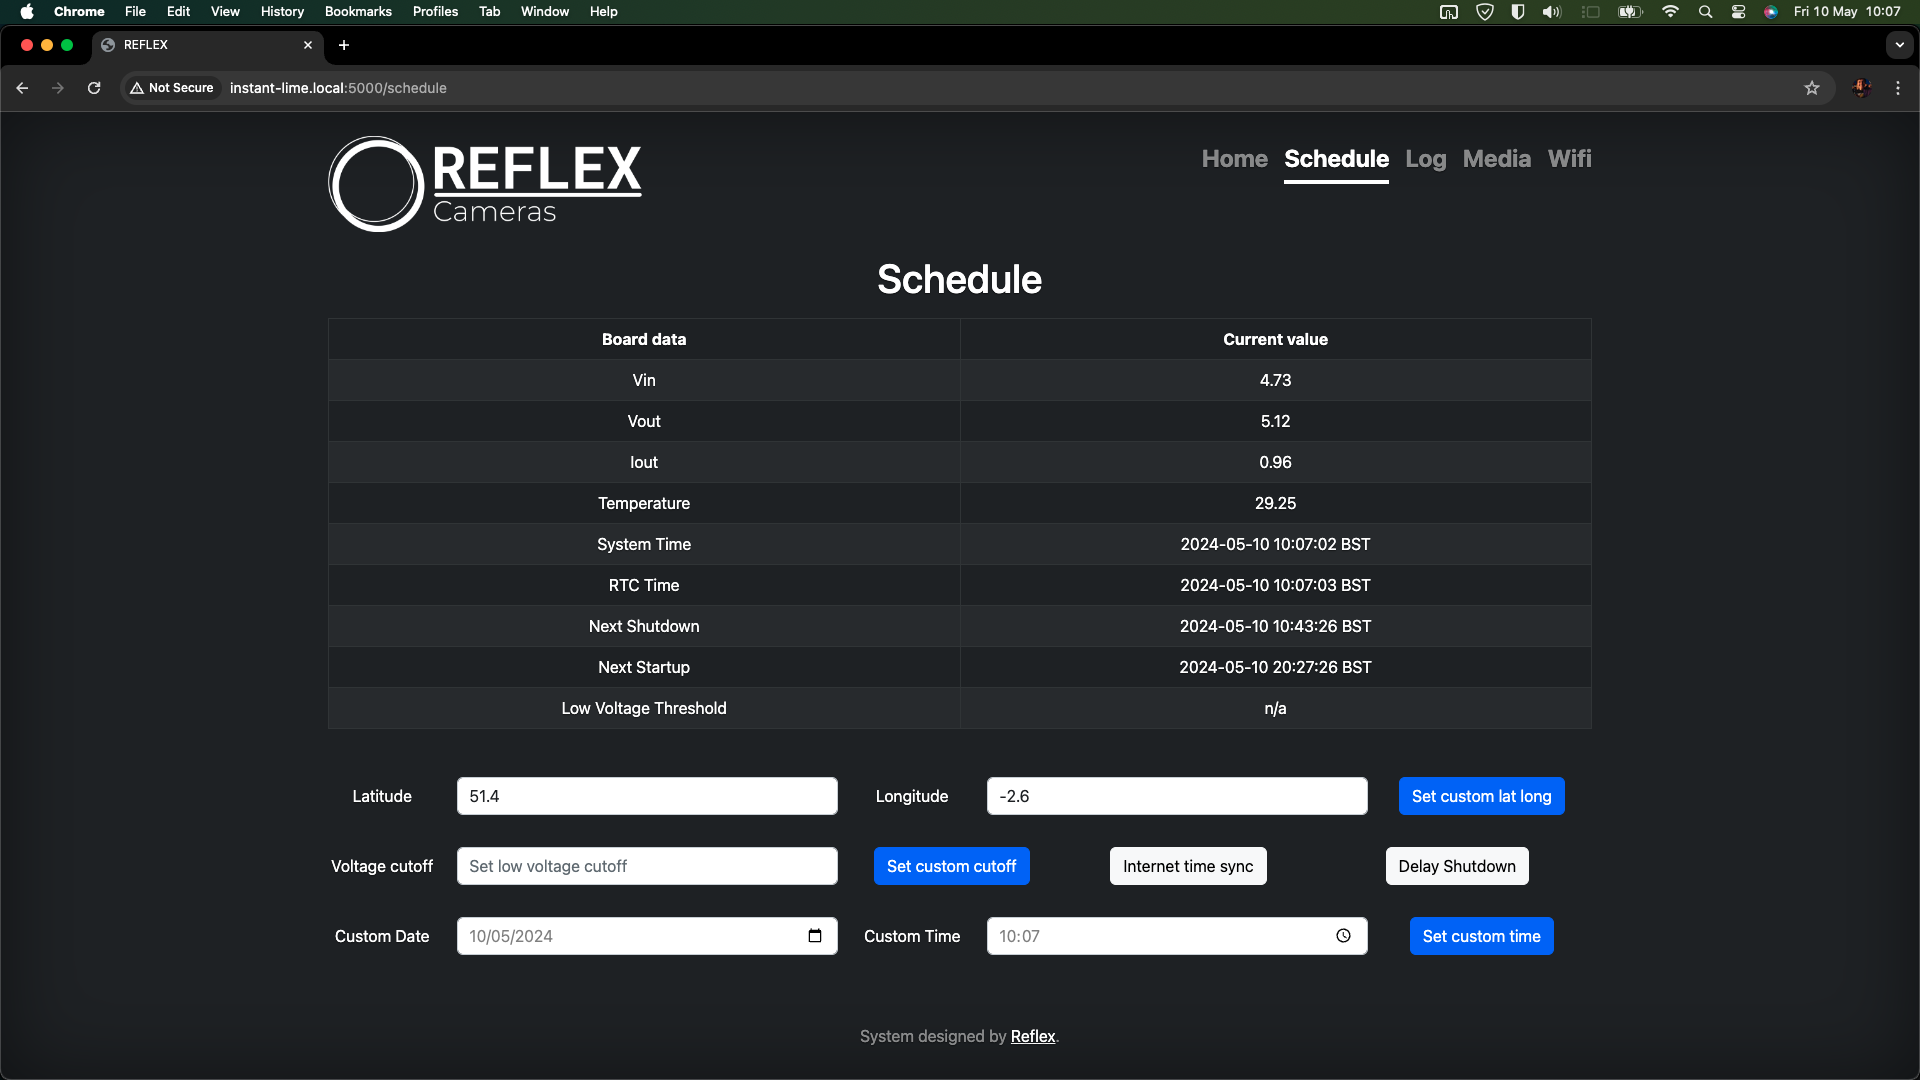
The values in the table on this page detail the power statistics and scheduling of the camera. When deploying check that these are correct. Example values are provided below.
| Board Data | Current Value |
|---|---|
Input (V) |
13.50 |
Power (W) |
4.46 |
Current (A) |
0.30 |
Temperature (°C) |
60.37 |
System Time |
Mon, 20 Jan 2025 15:42:15 GMT |
RTC Time |
Mon, 20 Jan 2025 15:42:14 GMT |
Next Shutdown |
Tue, 21 Jan 2025 08:23:00 GMT |
Next Startup |
Tue, 21 Jan 2025 16:20:58 GMT |
| Low Voltage Threshold | n/a |
Latitude Longitude Set custom lat long
The cameras scheduling (sunset and sunrise times) are calculated based on the camera’s Latitude and Longitude values. The camera turns on 20 minutes before sunrise and turns off 20 minutes after sunset Set custom lat long, the camera will automatically calculate the correct times and update the scheduled values for shutdown and startup, new values are displayed in the table on this page.
Delay Shutdown Delay camera shutdown by three hours. Useful when downloading media over WiFi or extending the time you have for setting up a camera in the daytime.
Set custom cutoff The camera will turn off automatically and stop its scheduled routine if it detects an input voltage below this cutoff value.
Small lithium battery packs i.e. Talentcell batteries have their own BMS protection and run at a a constant voltage determined by an internal regulator. If using a battery with internal BMS protection disable the cutoff by setting the Set custom cutoff value to 0.
To determine the appropriate cutoff value, please consult the battery manufacturer’s datasheet. For non-lithium batteries lower voltage cutoffs may extend run times but will likely reduce the overall lifespan of the battery. During testing an 11.3v cutoff was used with one 12v AGM battery which allowed for long run times with c.80% depletion but shortened the battery lifespan on each run. This is for informational purposes only it does not constitute a recommendation, check your battery datasheet and think about the lifespan of your battery.
Disclaimer: This feature is not designed to be a substitute for a dedicated battery management system. Reflex Cameras Limited accept no liability for any damage to the battery or other equipment resulting from an unsuccessful voltage cutoff. If battery health is critical to your application, you must use a dedicated system such as an undervoltage protection device or a solar controller. These devices are specifically designed to monitor battery voltage accurately and implement safe cutoffs reliably.
Internet time sync When connected to the internet (WiFi receive mode) - update the time and schedule on the camera by retrieving the current time and date from the internet.
Custom date Custom time Set custom time The fields Set custom date and Set custom time are populated with the current time and date on the device (phone or computer) connected to the camera. These values can be submitted without amendment so that the camera date and time match the time and date on the device (phone or computer). Alternatively, these values can be manually changed to any other time and date. The Set custom time button will use the entries in the Custom date and Custom time fields and update the camera date and time based on these values. The camera will update its schedule based on the new time.
Log
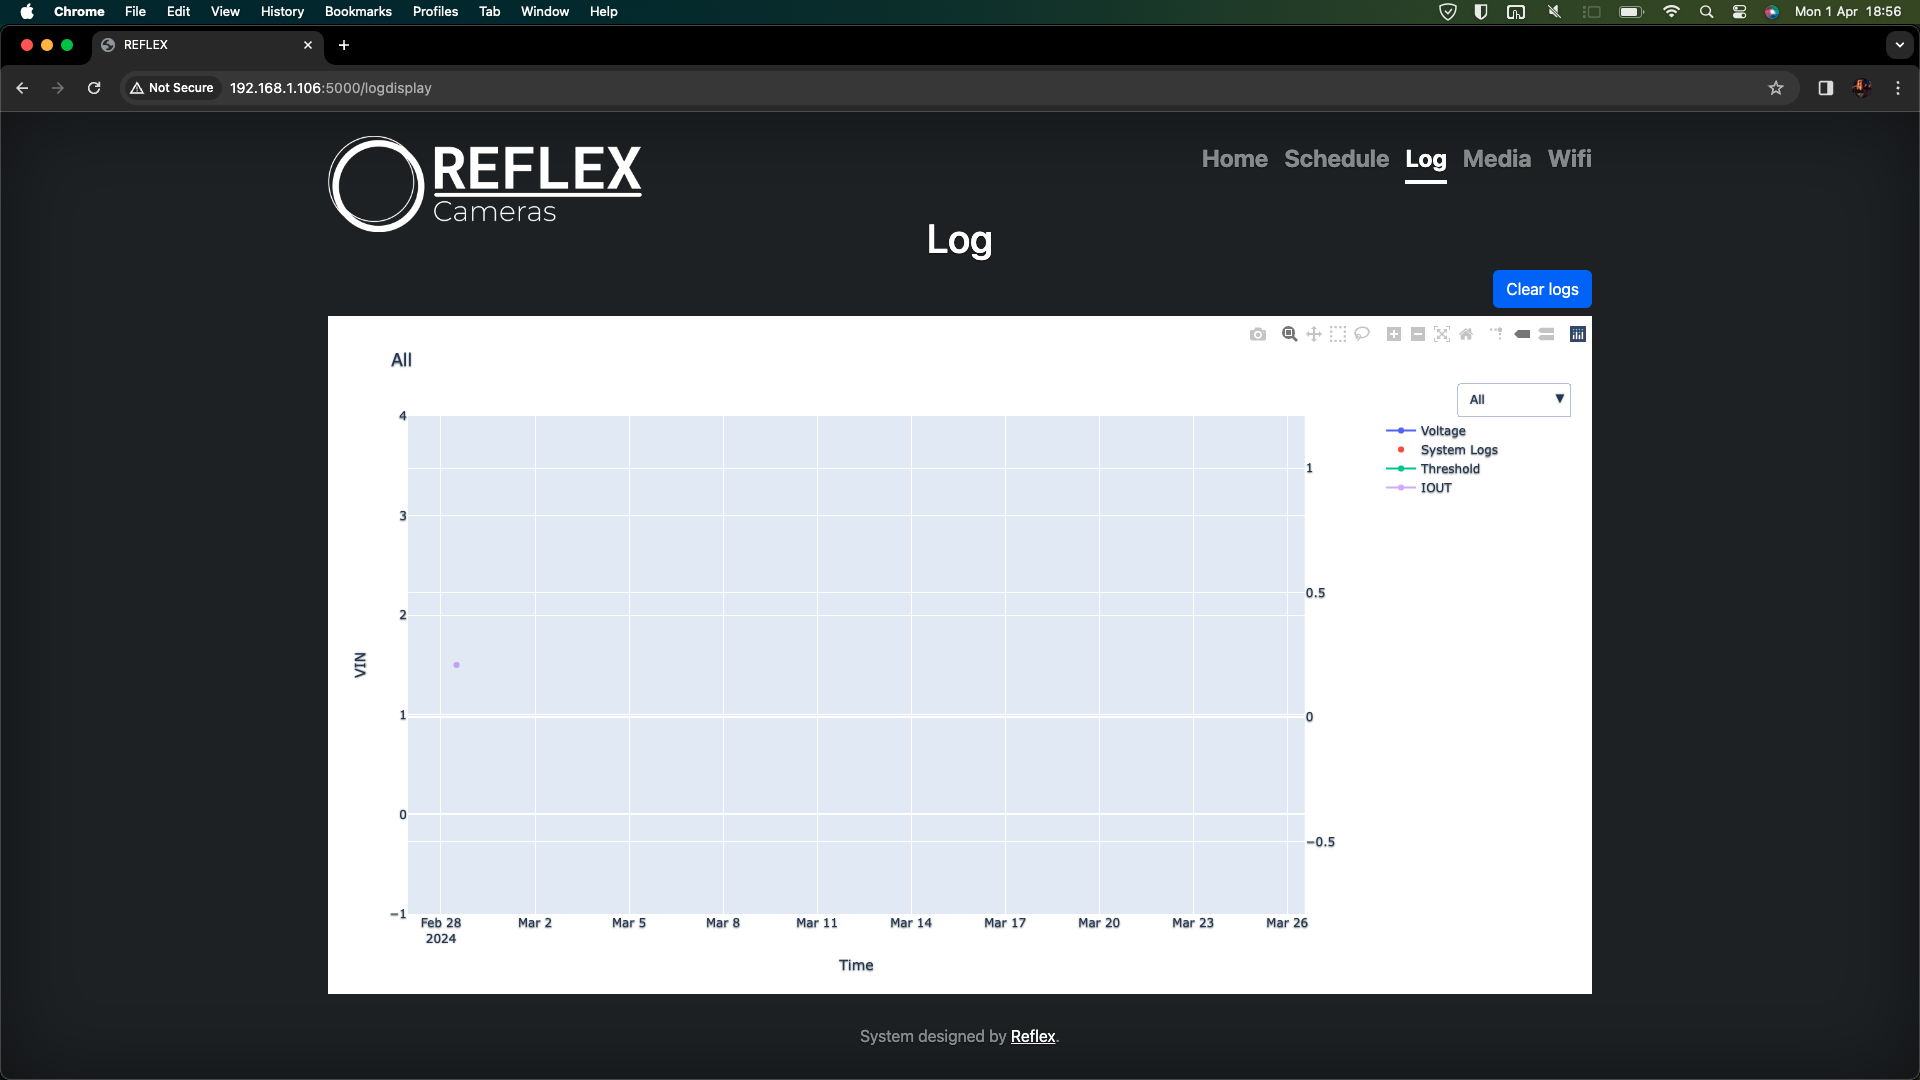
An interactive chart showing power statistics, shutdown, and startup times. Depending on the number of logs this can take from 5 seconds to 1 minute to load.
Clear logs Clears the existing logs and restart the logging.
Media
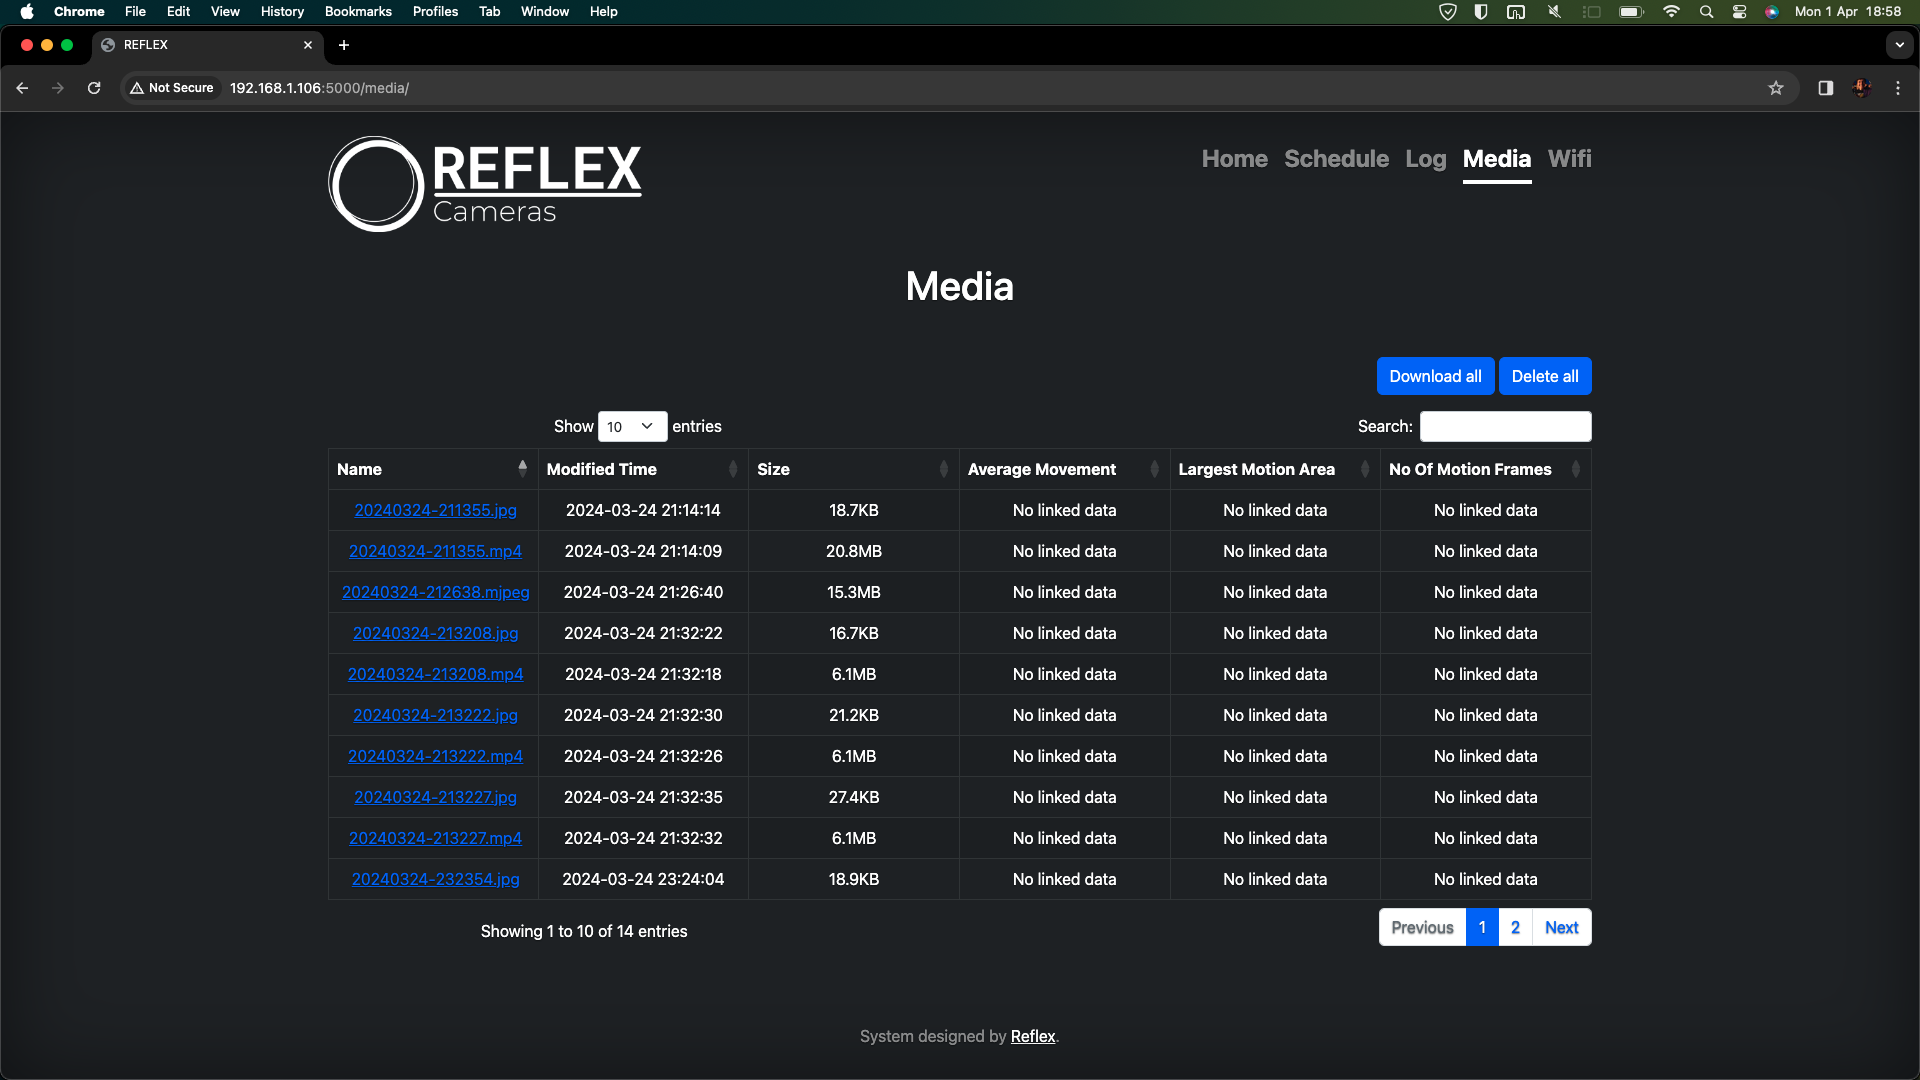
A list containing all
- recorded videos in mp4 format
- images in jpeg format - each image is a visual summary of motion from the video with the same timestamp. Motion detected in each frame of the video is overlayed onto a black and white background using red, green, and blue colours in sequence. In older software versions, the image simply shows the first frame where motion was detected.
- motionoutput.csv - a CSV file containing the motion statistics relating to each video
The jpeg and videos can be sorted by their motion statistics with the arrows in the column headers in the table.
If there are more than 1000 files saved on the camera only the first 1000 files will be listed and a message will state this. All of the files can still be downloaded using Download all.
The camera takes a few seconds to create jpeg and mp4 files from raw video after the last motion event. Refresh the page to see updates.
Media can be downloaded individually by clicking on the name of the file in the first column.
Download all Downloads videos and images from the camera onto the connected device (phone or computer) over WiFi. Use Chrome on the connected device (phone or computer) as this handles large downloads well. The camera will zip up all saved media and transfer this zip file over WiFi. Once downloaded the file can be unzipped on the connected device (phone or computer) to view the video and images. If the storage on the camera is over half full the camera will zip and send 1gb folders at a time and delete the 1gb of media which was transferred from the camera when the download is complete. In this instance, you will need to press Download all multiple times until the system has over half of its space free and can send a larger zip file. If this is taking a long time consider extracting the media directly from the micro SD card and use a larger micro SD card on future deployments.
Delete all Deletes all media saved on the camera. To avoid duplicate media, after the media has been copied from the camera it is good practice to delete the videos on the camera before the next deployment.
Format SD card Format an SD card so that it can be used by the camera. Warning this will delete all media on the SD card. If this is the first time using the card you will need to turn the camera on and off for the card to be recognised. Use a reliable brand like Sandisk or Samsung.
WiFi
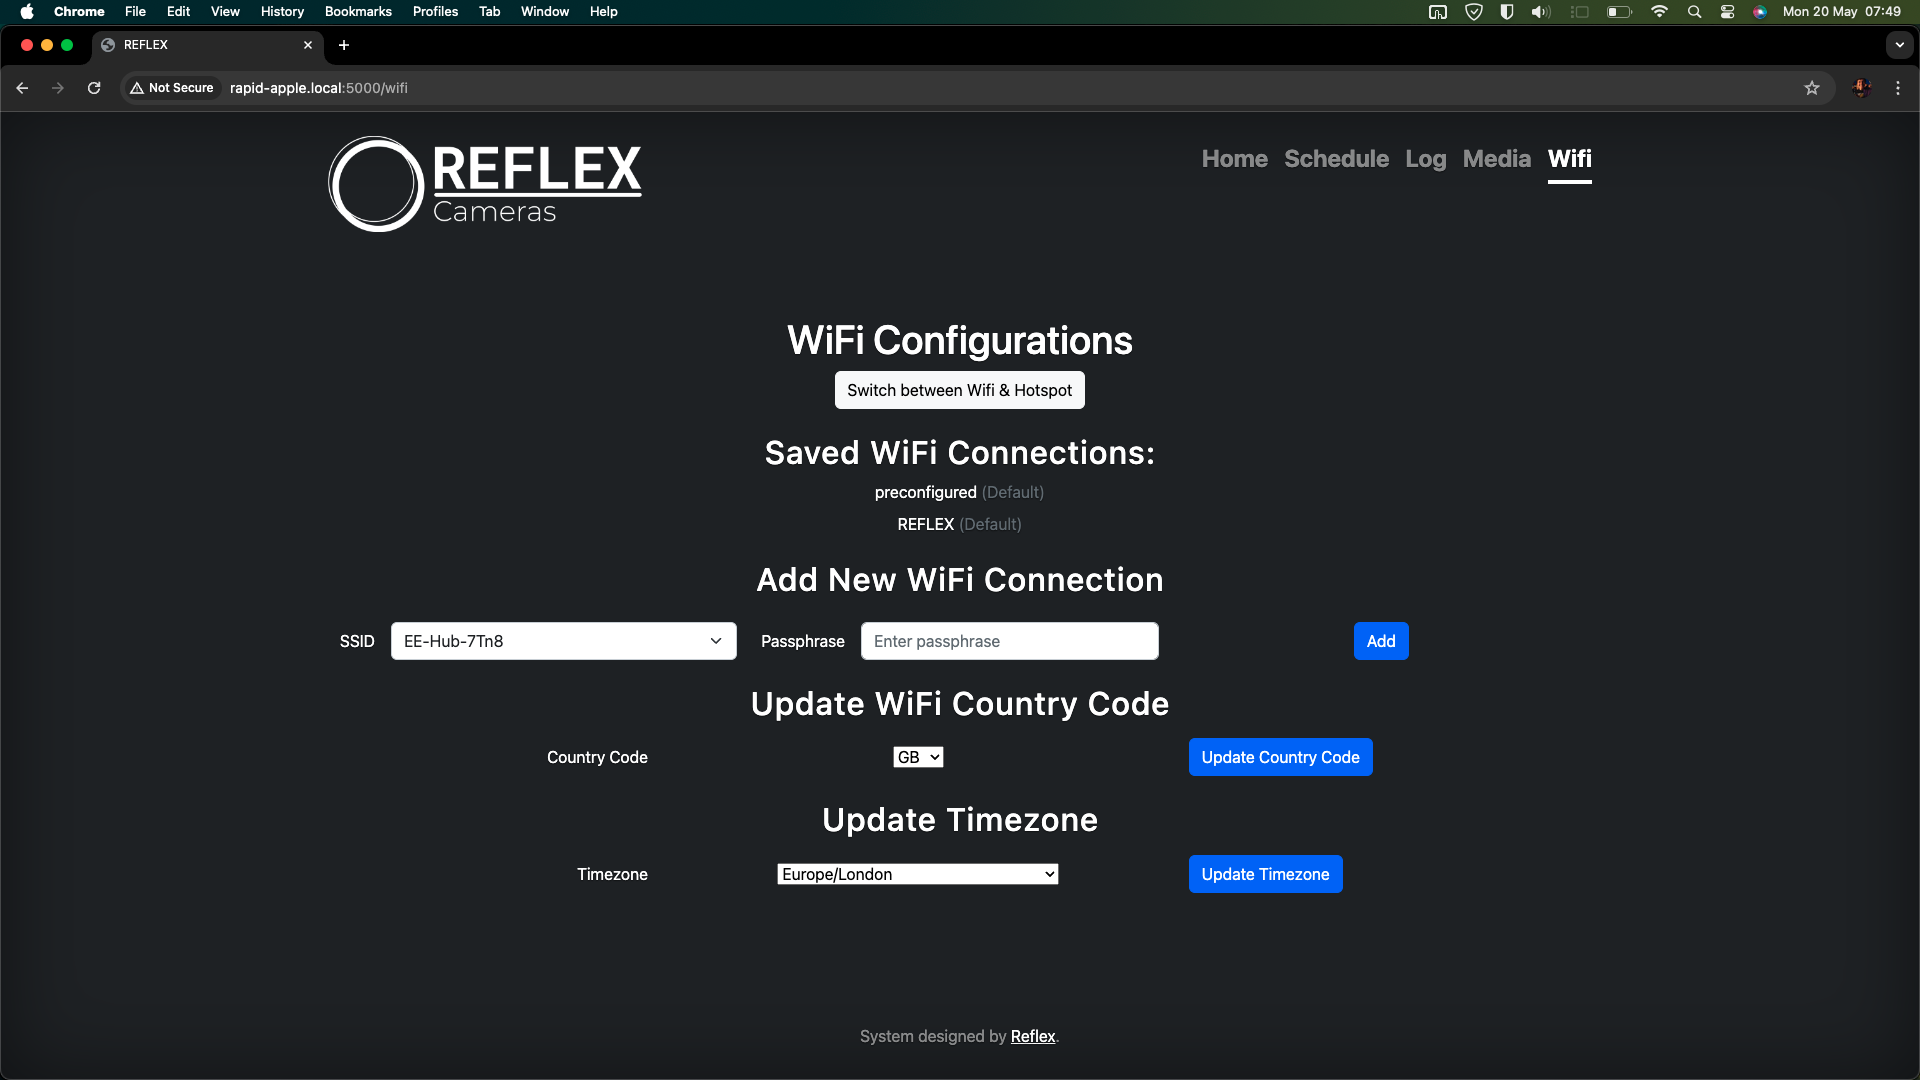
Switch between WiFi and hotspot Change WiFi mode. For further details see the ‘Advanced Users’ section below.
SSID Passphrase Add For further details see the ‘Advanced Users’ section below’. The dropdown SSID will list all WiFi connections in range of the camera that it is possible to connect to. The page may need refreshing if WiFi connections are not seen. The WiFi password associated with a WiFi connection should be entered in the Passphrase field. The camera can’t check the new SSID or Passphrase so ensure these values are correct before submitting the values with the Add button. The Add button will then add the WiFi connection to the camera. When a new connection is added the camera will switch to WiFi receive mode, the camera will reboot automatically and connect to this WiFi connection and this can take up to one minute.
Update WiFi Country Code will change the WiFi settings so that the WiFi is compliant with a country other than GB (Great Britain). Your camera will need powering off and on for this WiFi setting to take effect.
Update Timezone will change the timezone from the default Europe/London (GMT) to ensure that the camera scheduling is correct in countries other than the UK.
Field setup
Familiarise yourself with setting up the camera in the field by deploying it on some non-roost trees. Practice will mean you can set the camera up quickly and quietly with around bat roosts.
Positioning light stand on tree
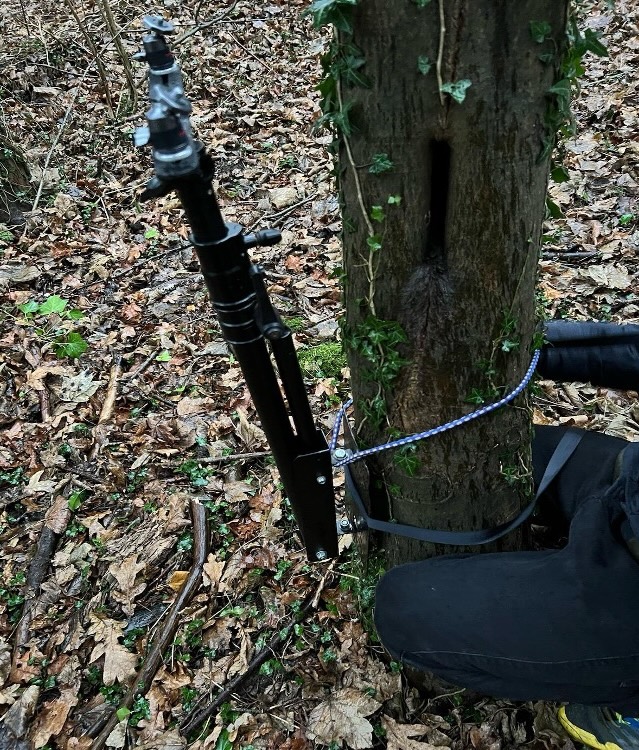
Recommended procedure:
- Remove leaves or cobwebs from the area of interest to avoid false triggers
- Use a bungee cord to hold the camera stand on the tree for initial placement
- Feed ratchet straps through the stand and tighten them so that the stand is secure
- Remove the bungee cord (optional)
- Screw the camera onto the tripod
- Connect battery
- Position the tripod so the camera is viewing the roost feature. It is best if the camera is tipped slightly forward to reduce the number of false triggers from rain
Housekeeping

Coil cables carefully when not in use. Avoid tight coiling. Instead, gently follow the cable’s natural curve and alternate between “over” and “under” loops to prevent twists. There are several good instruction videos on YouTube.
Reviewing footage
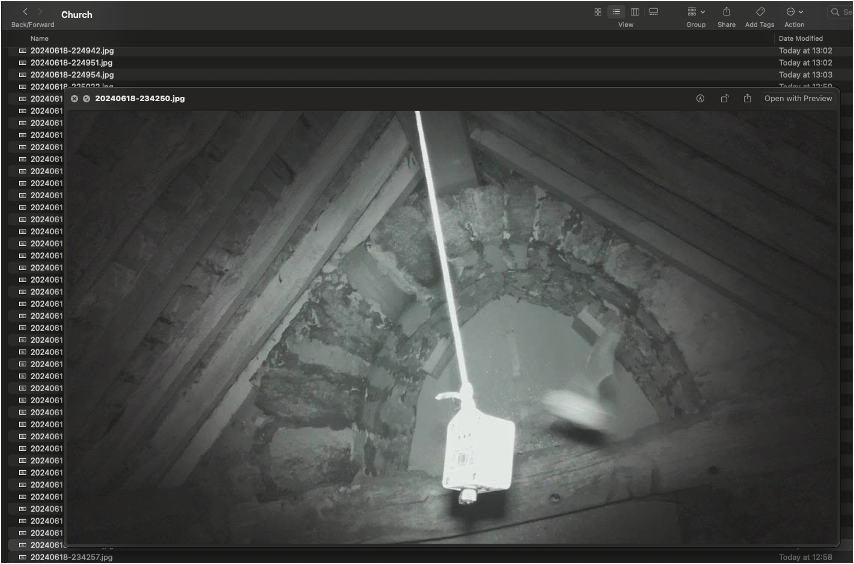
Once footage is downloaded from the camera it is quickest to scroll through the jpeg files saved alongside the videos in the media folder. These jpeg files are a visual summary of motion in each video. Motion detected in each frame of the video is overlayed onto a black and white background using red, green, and blue colours in sequence. In older versions of the software the jpegs simply represent the first frame where motion was detected contain the wildlife that triggered the recording most of the time. The jpegs provide a quick way to review lots of media.
On Mac use Preview.
On Windows use FastPictureViewer or an equivalent.
Advanced users
This section is for advanced users and contains methods to connect the cameras to the internet for an update.
Checking status
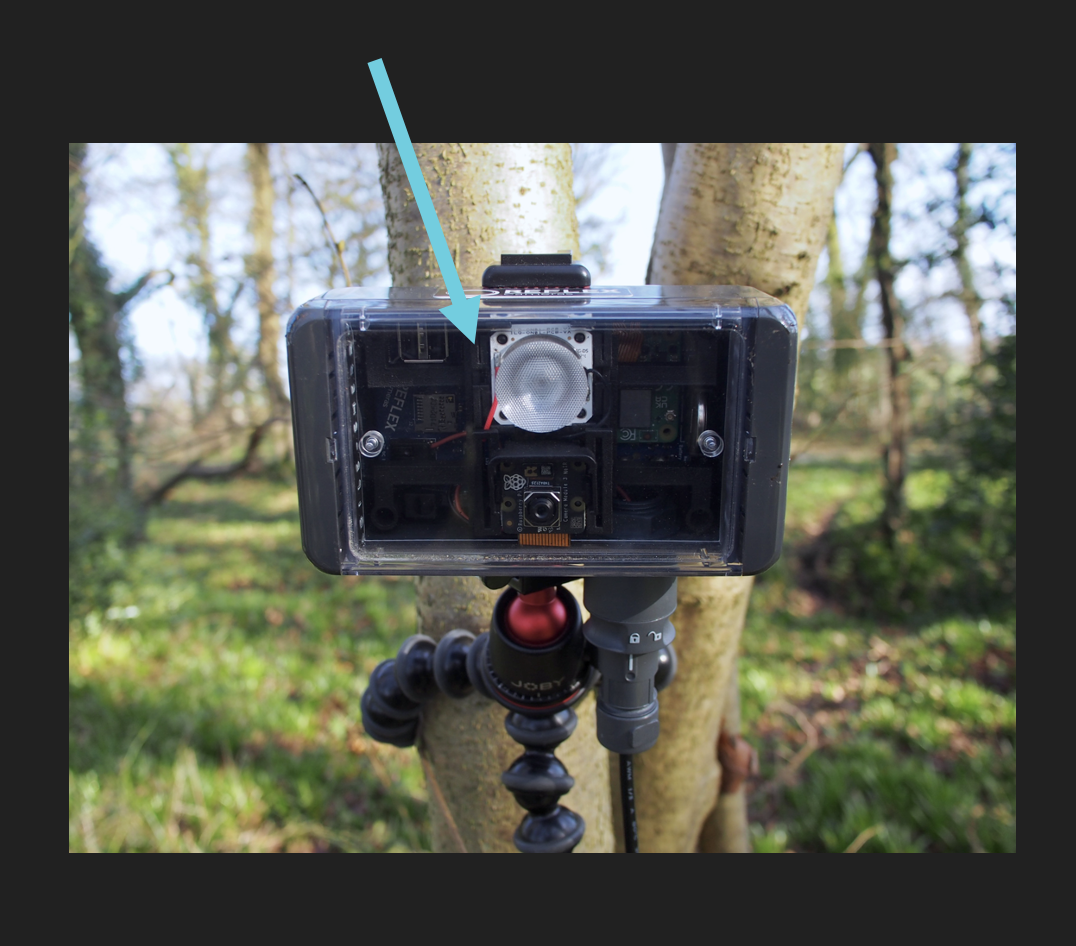
There is a small indicator IR (infra-red) LED located at the top of the camera on the PCB. This can be used to monitor the WiFi mode. This LED is infra-red so only visible using the camera on a phone.
- If the REFLEX camera is producing an active WiFi hotspot the small IR indicator LED will flash rapidly
- If the REFLEX camera is in wifi mode the small IR indicator LED will flash slowly (once every 2 seconds)
Different modes
Hotspot mode
In this mode, the camera broadcasts its own WiFi connection and hosts the Reflex settings webpage on 10.42.0.1:5000 The website can be accessed by device (phone or computer) connected to the camera WiFi network:
- SSID:
REFLEXHOTSPOT-REFLEX0000- replace 0000 with the number printed inside the camera lid - Password:
REFLEXREFLEX- on Windows it may ask you to enter a pin number rather than a password. In this case press connect using a password instead and enterREFLEXREFLEX. On some Android phones you may receive a notification statingWiFi has no Internet Access. Tap for Options. To connect to the hotspot, tap this notification then selectThis network has no Internet Access. Stay connected?and also checkDon't ask again for this network.
WiFi receive mode
In this mode, the camera connects to nearby WiFi network. The camera broadcasts the Reflex settings webpage over this connection.
The webpage address is defined by the router i.e. xx.xx.xx.xxx:5000
If the WiFi network has internet the camera can be updated in this mode by using the Upgrade button on the Home Page of the Reflex settings webpage.
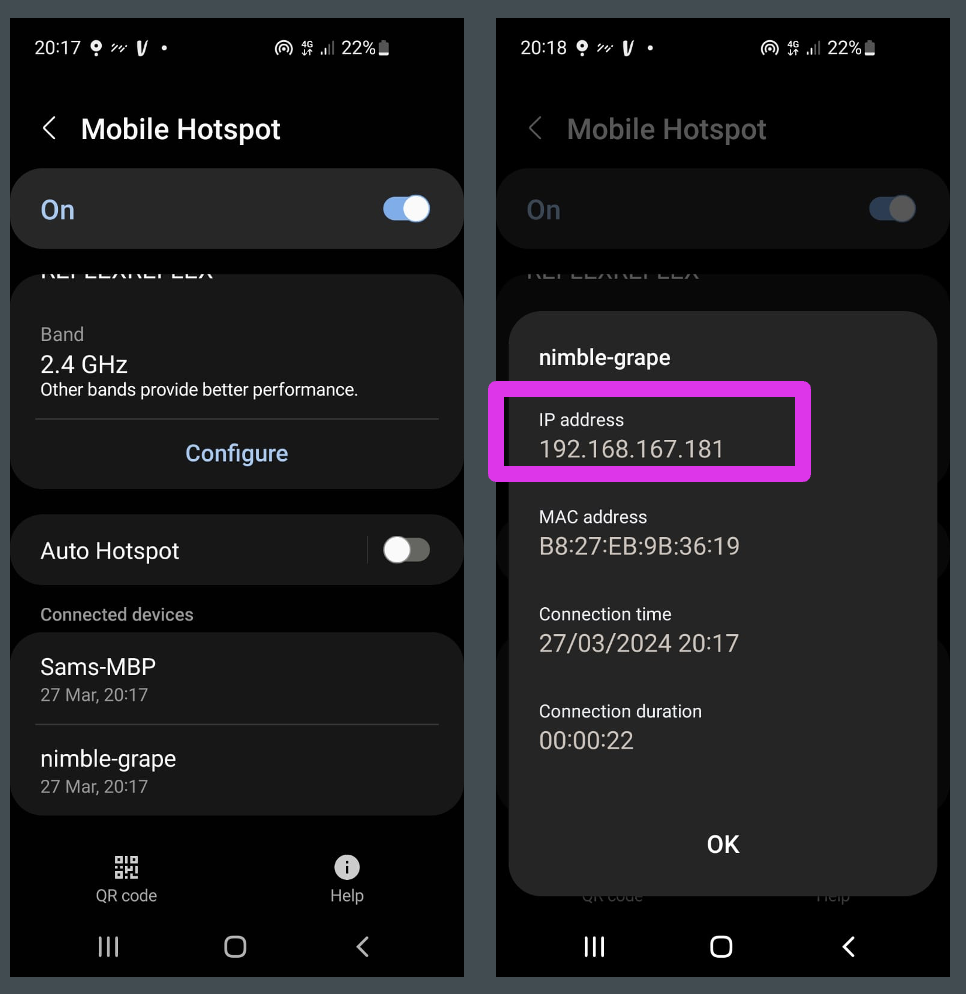
WiFi receive mode Android hotspot
On your Android phone create a hotspot on your phone with the SSID REFLEX with password REFLEXREFLEX
Open the lid of the camera, press the button to switch from hotspot mode to WiFi mode or press the Switch between WiFi and hotspot button on the WiFi page of the camera’s Reflex settings webpage.
Your camera may need powering off and on at this point.
Once re-powered go to the mobile hotspot settings on your Android. Scroll to bottom of this settings page and find ‘connected devices’.
Hold down on REFLEX camera hostname i.e. REFLEX0000 - replace 0000 with the number printed inside the camera lid. The IP address is shown on the next page (it is likely to look something like 192.168.167.181).
Open a webpage and type in this IP address, followed by :5000, into the search bar web i.e. http://XX.XX.XX.XX:5000
You will be connected to the camera.
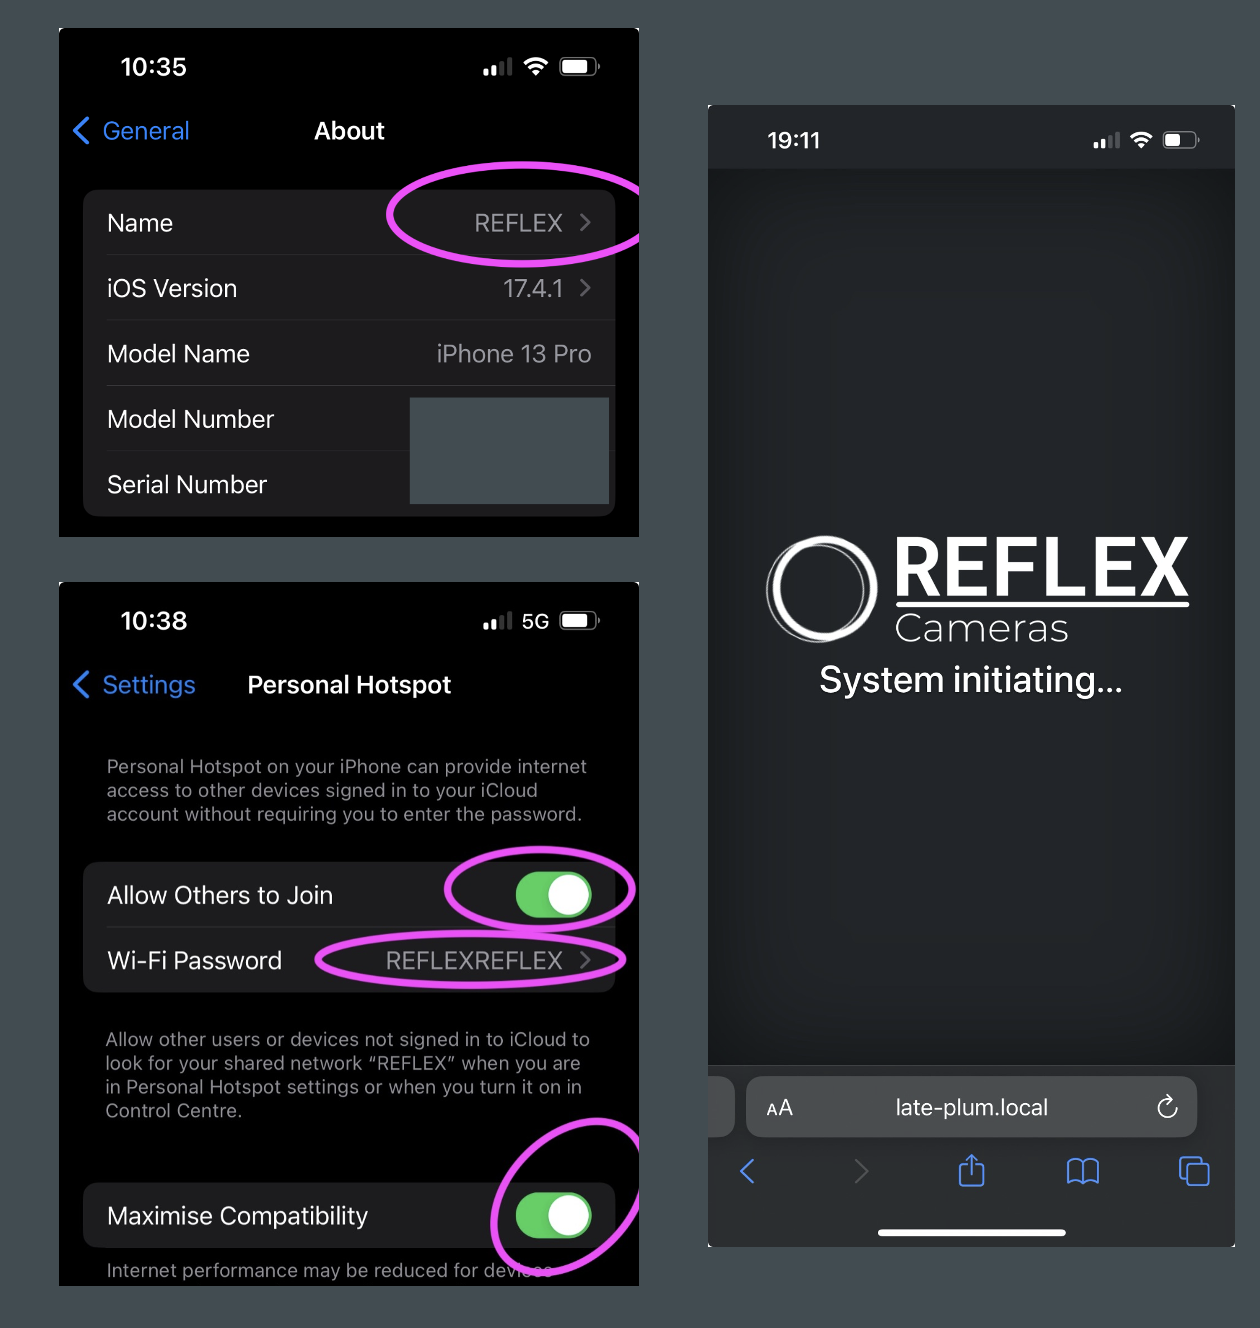
WiFi receive mode iOS hotspot
On your iPhone create a hotspot.
You will need to change the SSID to REFLEX and the password to REFLEXREFLEX
To change the iPhone personal hotspot SSID you need to change the name of your phone - unfortunately there is no other way to do this on iOS. To do this head to the iPhone settings menu go to -> Settings -> General -> About -> Name -> and change the name to REFLEX
To change the personal hotspot password go to Personal Hotspot -> Wi-Fi Password and change the hotspot password to REFLEXREFLEX
Turn on Settings -> Personal Hotspot -> Allow others to join
Turn on Settings -> Personal Hotspot -> Maximise compatibility
Restart iPhone. The hotspot may have automatically turned off during the reboot, if so turn back on using Settings -> Personal Hotspot -> Allow others to join
Power up the REFLEX camera, if in WiFi mode it will now connect to the iPhone hotspot.
Optionally connect your mac to this hotspot.
Find the hostname of the REFLEX camera (printed in REFLEX lid).
Open a webpage on Chrome and type in this hostname followed by :5000, into the search bar web i.e. ‘http://REFLEX0000.local:5000’ - replace 0000 with the number printed inside the camera lid.
You should now see the Reflex settings webpage.
WiFi receive mode - additional connections
The camera can be connected to a normal WiFI connection at home or in an office. Due to complications with IP addresses this method is not included in this guide. If you need to use this feature please contact us using the contact form on our webpage and we can supply more information.
Product FAQs
How do I update my camera?
To update your camera’s software, you first need to provide it with an internet connection by switching it to WiFi receive mode (see WiFi receive mode). Once the camera is in WiFi receive mode and connected to a device with an internet conection:
- Open the Reflex settings webpage in your browser.
- On the Home Page, press the
Upgradebutton. - Wait while the update downloads and installs — the loading indicator will work towards
100%, and the page will refresh automatically when the update is complete.
If the page does not refresh automatically after at least 10 minutes, refresh the page manually on your browser and when the page is reloaded press the Upgrade button again. Wait until the loading indicator reaches 100% and the page refreshes.
After the update is finished, it’s recommended to switch the camera back to hotspot mode for normal use (see Hotspot mode). This mode is better suited to field operation.
How long does a REFLEX Camera last on a Talentcell 12V Lithium-ion Battery Pack, 11.1V/9000mAh 99.9Wh Portable Power Bank Li-ion Battery?
In summer, you can expect approximately:
- 4 nights at 30 FPS with the LED set to 20
- 3 nights at 60 FPS with the LED set to 40
- 2 nights at 120 FPS with the LED set to 60
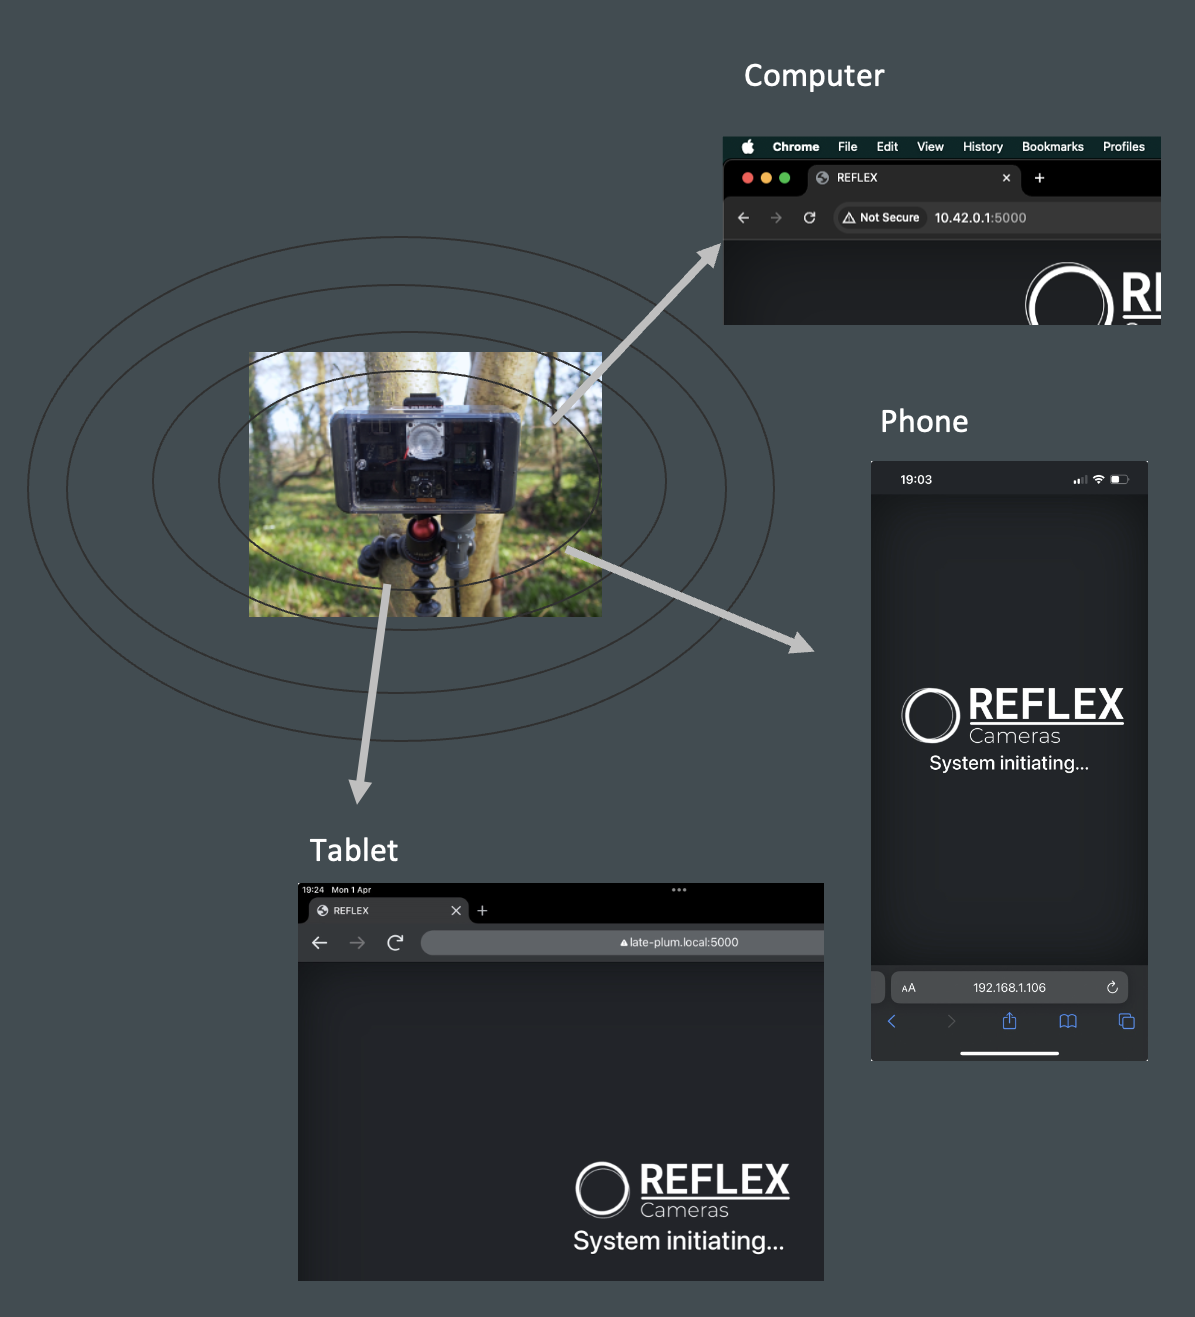
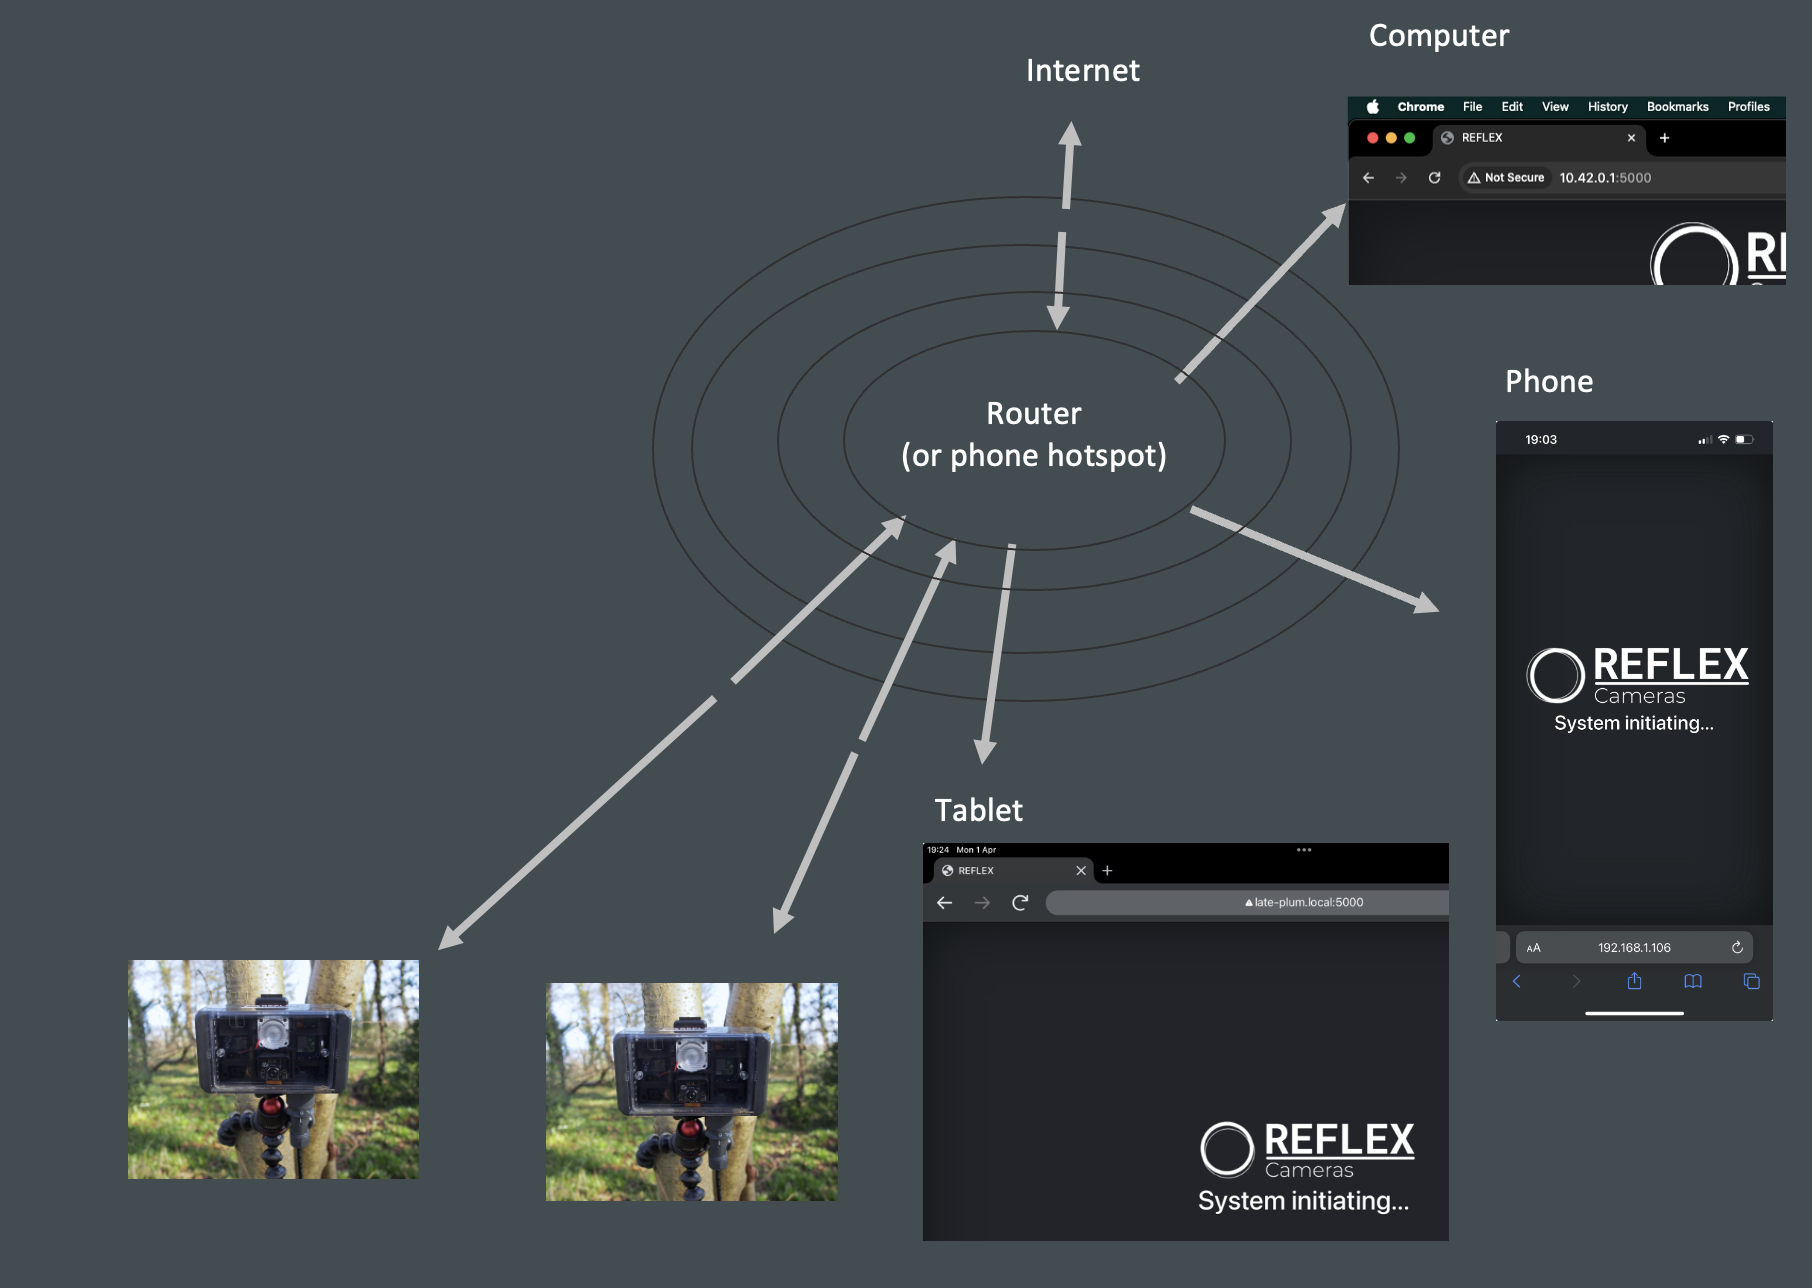
Can I watch REFLEX Camera videos remotely over the internet?
Not directly. Each REFLEX Camera broadcasts its own short‑range Wi‑Fi hotspot (effective up to about 10 m / 30 ft). Within that range, you can:
- View a live stream on a connected phone, tablet, or laptop
- Download recorded clips straight from the camera
Because the hotspot is local‑only, the feed is not routable over the wider internet - you would need an external network solution (e.g., a router or cellular gateway) to make the stream accessible online.
Can I power a REFLEX Camera with a solar panel?
Yes. REFLEX Cameras are designed to run from a 12 V leisure battery, so pairing that battery with a solar panel and charge controller is an easy way to keep the system topped up and extend deployment time indefinitely.
- Compatible panels: Any 12 V (nominal) panel - typically 20 W – 100 W depending on how much sun you expect, how many cameras share the battery and whether you want the panel to fully charge the battery.
- Shade‑friendly: Even under light tree canopy a modern panel will trickle‑charge; you can mount it in a small gap or on a pole that reaches full sun.
- Extras you’ll need:
- PWM or MPPT charge controller to protect the battery
- Inline fuse for safety
- Mounts for the panel
With the right‑sized panel, the camera can stay in the field far longer than with the battery alone - often all season.
How long will the camera last running on different batteries?
The number of nights a camera will record is dependent on the night length and camera settings. Higher camera frame rates require brighter lighting, which in turn consumes more power. A camera set to 30FPS will last roughly twice as long as one set to 120FPS.
It is possible to extend runtimes using most standard 12v batteries (excluding talentcell batteries) by using solar panels or by linking multiple batteries together. Be sure to follow the battery manufacturer’s guidance. For recommendations on solar panels or battery linking, consult with an off-grid battery supplier.
A battery weighing around 11kg can be carried fairly easily while navigating a woodland. This weight corresponds to a 75Ah lithium battery or a 40Ah lead-acid battery, both of which will provide several weeks of recording at 30FPS. Smaller, more portable 12V batteries, like the TalentCell models, can also be used but will deplete faster.
If you’d like to estimate the system’s runtime at 30FPS, enter a battery’s capacity in amp-hours below. This estimation assumes an average night length of 9 hours.